 This is part of a series of walk throughs exploring CI in TFS, starting from the ground up. The entire series and source code are maintained at this BitBucket repository.
https://bitbucket.org/bladewolf55/tfs-ci-samples
Previous Part: TFS Continuous Integration Walk Through Part 5b - Multiple Solutions: Simple Project References
What I'm Talking About
Businesses often have source code that's years or decades old, and accumulate problems due to how that code was structured into folders. Especially difficult is how dependencies were managed. It's common to see:
- Projects with project references to other projects in other solutions, sometimes nesting/cascading in a tangled mess.
- Third party libraries that require installation, such as UI controls.
- Multiple ways of managing .dll dependencies.
Some common challenges--and reasons why the above happen--are:
- Multiple projects depend on a shared project, and they often need to step through the shared project's code.
- Over the years, different developers did things how they liked.
- Source control wasn't used, or changed.
Where I'll End Up
I'll start with a set of solutions that have some dependency problems. I'll show how they can work with continuous integration. Then, I'll improve the dependency handling.
A Problematic Structure
Let's imagine a TFS repository. Instead of a separate Team Project for each solution, there's a single Team Project named $Main that has all the solutions underneath it.
In this folder structure, I'm showing solution folders with their project folders below. So, ReverseIt is a solution folder with the ReverseIt project folder below it, which is the default Visual Studio layout.
$/Main
_Shared
   NameDb
     NameDb
ReverseIt
  ReverseIt
    > Depends on RevEngine (project reference)
  RevEngine
    > Depends on jamma.dll
ReverseNames
  ReverseNames
    > Depends on RevEngine (project reference)
    > Depends on NameDb (NuGet package)
- NameDb DLL returns a list of names, is packaged using NuGet, and stored in a local source.
- ReverseIt Console reverses whatever text you type in.
- RevEngine DLL has ReverseText method. It is a project reference.
- Jamma.dll is a third party security dll. The company is out of business.
- ReverseNames Console displays a list of reversed names coming from NameDb.
What are the pros and cons of this approach?
Pros
- If you Get Latest on $Main, all the solutions are in their correct relative folders.
Cons
- You often have to get source you don't need.
- The dependency on relative paths is brittle.
- You can't use TFS's project management tools effectively.
- Doesn't scale. What if you had fifty solutions using this approach?
Creating CI Builds As Is
My manager says, "We need to get these projects into TFS Build."
I ask, "Can I restructure TFS?"
He says, "Not yet."
I say, "OK."
Since I'm pretty sure there are dependency problems, the first thing I decide to do is spin up a clean machine, install Visual Studio with no changes, Get Latest on $Main, and try to build all the solutions.
What's this!? Multiple failures? Oh, no! What went wrong?
- ReverseNames failed because we're depending on an in-house NuGet package source, and didn't configure that, so the NameDb dependency didn't exist.
- RevEngine failed because Barry's the only developer who has ever worked on RevEngine, and only his machine has jamma.dll. It was never checked into source control.
Quite a bit more could go wrong, but you get the idea. Let's fix these with an eye toward our eventual build server.
BONUS CODE!
If I had lots of solutions, I could build all of of them using two files in the root of the folder than has all the solution folders.
BuildAllSolutions.targets
<Project ToolsVersion="14.0"
xmlns="http://schemas.microsoft.com/developer/msbuild/2003"
DefaultTargets="Default">
<!-- http://stackoverflow.com/a/9609086/1628707 -->
<ItemGroup>
<AllFiles Include=".\**\*.sln"/>
</ItemGroup>
<Target Name="Default">
<PropertyGroup>
<BuildCmd>@(AllFiles->'"$(MSBuildToolsPath)\msbuild.exe" "%(Identity)" /v:q /fl /flp:errorsonly;logfile=build-logs\%(filename)-log.txt','%0D%0A')</BuildCmd>
</PropertyGroup>
<Exec Command="mkdir build-logs" Condition="!Exists('build-logs')" />
<Exec Command="$(BuildCmd)" />
</Target>
</Project>
BuildAllSolutions.cmd
--rem path to your latest VS build version
"C:\Program Files (x86)\MSBuild\14.0\Bin\msbuild.exe" BuildAllSolutions.targets
pause
Running the cmd file creates a folder named "build-logs", recursively builds each solution, and outputs each solution's errors. If a solution's log file is not empty, there was a build problem.
END BONUS CODE
Dealing With a Local NuGet Package Source
There are four (technically five or six!) places to store NuGet config files containing package source information, and two ways to configure package source in TFS Build.
NuGet Config File Locations
Let's assume our in-house NuGet source is located at http://ngserver/nuget.
- User Profile - Enter it into Visual Studio's settings. This is fine for regular development, but not good for a build server because the build agent service will run as either Local System or a specific user account such as "tfsagent".
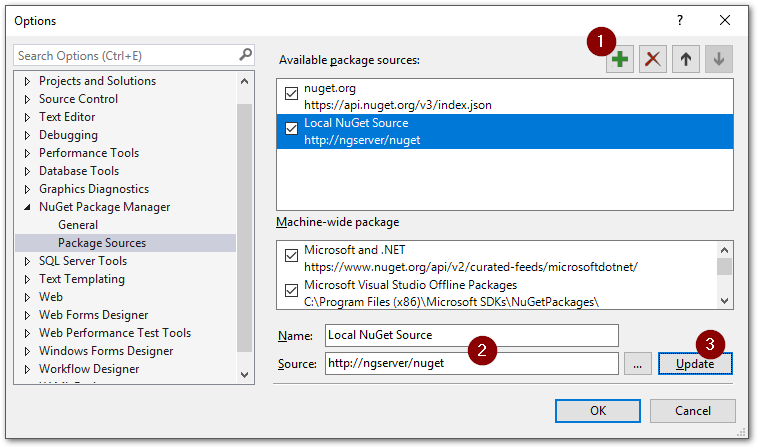
You can also manually edit the user profile's nuget.config, which is what the Visual Studio setting dialog is doing. The file is located at %APPDATA%\NuGet\NuGet.config. You add the source under packageSources.
<?xml version="1.0" encoding="utf-8"?>
<configuration>
  <activePackageSource>
    <add key="nuget.org" value="https://www.nuget.org/api/v2/" />
  </activePackageSource>
  <packageSources>
    <add key="nuget.org" value="https://api.nuget.org/v3/index.json" protocolVersion="3" />
    <add key="NuGet Local Source" value="http://ngserver/nuget" />
  </packageSources>
  <packageRestore>
    <add key="enabled" value="True" />
    <add key="automatic" value="True" />
  </packageRestore>
  <bindingRedirects>
    <add key="skip" value="False" />
  </bindingRedirects>
</configuration>
- Solution - Create a solution-level nuget.config file.
You can create a file named nuget.config, put it in your solution's root and add it to source control. This will determine which NuGet sources the solution uses.
<?xml version="1.0" encoding="utf-8"?>
<configuration>
  <packageRestore>
    <add key="enabled" value="True" />
    <add key="automatic" value="True" />
  </packageRestore>
  <packageSources>
    <!-- uncomment clear if you want to ONLY use these sources -->
    <!-- otherwise, these sources are added to your list -->
    <!-- clear /> -->
  <add key="NuGet Local Source" value="http://ngserver/nuget" />
  </packageSources>
</configuration>
Note: NuGet 3.3 and earlier looked for a config file in a solution's .nuget folder. Not recommended.
- Machine-Wide - Create a machine-wide config file.
The machine-wide story is confusing. A machine-wide NuGet config file can reside in one of two folders. The folder changed with the introduction of NuGet 4.0, which is used by Visual Studio 2017.
%ProgramData%\NuGet\Config\ (NuGet 3.x or earlier), or%ProgramFiles(x86)%\NuGet\Config\ (NuGet 4.0+)
It can be named anything that ends with .config, including NuGet.config. However, a custom name seems recommended.
For example, I could name the file SoftwareMeadows.Online.config. It would contain the package source like this:
<?xml version="1.0" encoding="utf-8"?>
<configuration>
  <packageSources>
    <add key="NuGet Local Source" value="http://ngserver/nuget" />
  </packageSources>
</configuration>
Network Administrators will like this option because they can use it with Group Policies. A policy could target computers in Developers and Build Servers groups and always create the desired config file.
Note: NuGet 4.x does not look for config files in ProgramData.
- Default Config
If you're using NuGet 2.7 through 3.x, default sources can also be configured in the file %ProgramData%\NuGet\NuGetDefaults.config. These show up in Visual Studio as local, not machine-wide, sources.
Note: This file and location will not work with NuGet 4.x
- Other?
You could also put a nuget.config file in any folder and specify it using the nuget.exe -configFile switch, e.g. nuget restore -configfile c:\my.config.
Notes
- Testing shows that in some cases if the package source URL is the same, only one source key is used. For example, if NuGet.config and NuGetDefaults.config have an identical source URL, the key from NuGet.config is used.
- It appears a source listed in NuGetDefaults.config cannot be removed using the
<clear /> tag. It can only be disabled.
Specifying the Config in TFS Build
Whichever method you use below, ensure the agent service has permissions to the config file. The service name will be something like "VSO Agent ([AgentName])". Microsoft recommends creating a user named "tfsagent". The default is Local Service.
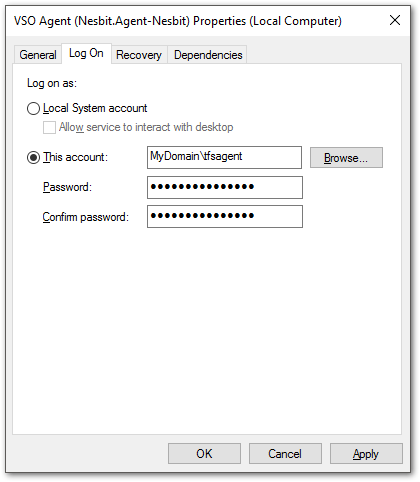
- TFS Machine-Wide Path - RECOMMENDED
Personally, for internal development, I'd add the package source to the build server's machine-wide config file and be done with it. So, my path--assuming VS 2015 installed--would be something like: %ProgramData%\NuGet\Config\SoftwareMeadows.Online.config
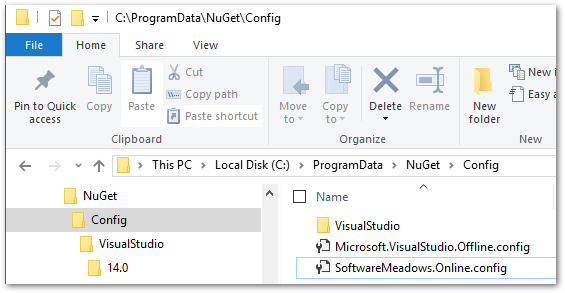
Remember from above this will change if you install Visual Studio 2017 on the build server (or use NuGet 4.x).
- Add nuget.config to the build agent's profile.
Your build server is basically a development machine, with an agent automatically building the software. If you run the service using tfsagent, you could create/edit a nuget.config file found at C:\Users\tfsagent\AppData\Roaming\NuGet.
- TFS NuGet Installer Path Field
If you check in a nuget.config file with the solution, enter the path in your build definition's NuGet Installer step. This path is relative to the Path to Solution. I would use this solution if my team didn't all work in the same network, and so needed to use an authenticated NuGet server such as MyGet.

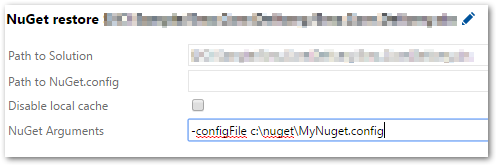
- Use the -configFile switch
You could also put a nuget.config file somewhere on the build server (or network?), and use the -configFile switch. Remember the build agent service needs permission to read the file.
Dealing with Barry
Barry's been with us for five years. Barry drinks his coffee black, and lots of it. Barry knows where every file on his machine is, and would prefer you didn't look over his shoulder. Barry has his code, please leave it alone.
Unfortunately, Barry assumes he'll always be here, and hasn't ever tested what would happen if his machine imploded in a fiery death. I go to Barry and say, "Your code doesn't build on a clean checkout." Barry storms over to my computer and starts typing. I observe, take notes, and when I see him copying jamma.dll, ask, "What's that?"
"Oh," he mumbles, "license dll. Forgot about that. Kinda important. RevEngine won't run without it."
I don't say anything, but make a note that, once I have all the software building and deployable, Barry might not be long for our company. In the meantime, there are two ways I can handle this old dependency.
- Ensure it's in a folder under the solution or project, reference it there, and add it to source control.
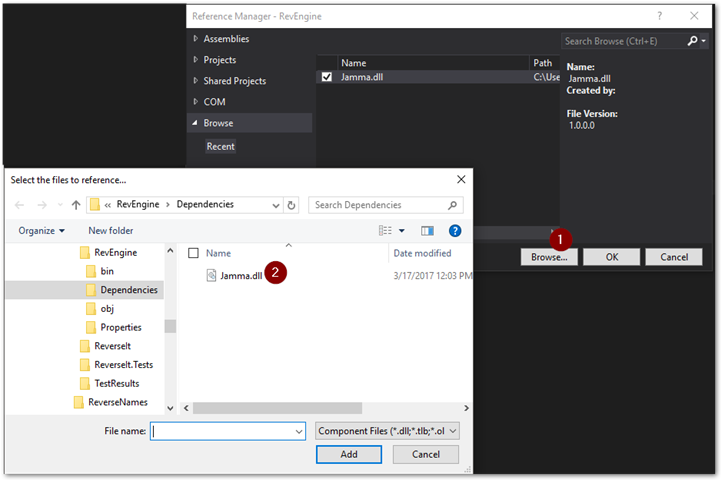
- Create the dll as a NuGet package, and add it to my NuGet server.
Download nuget.exe and put in same folder as the dll (or put in its own folder and add to the system path variables).
Open a command prompt, change directories to where the dll is, and run nuget spec jamma.dll.
Edit the resulting damma.dll.nuspec file, change or remove elements as desired.
<?xml version="1.0"?>
<package >
  <metadata>
    <id>jamma.dll</id>
    <version>3.2.52</version>
    <authors>Jamma Ltd</authors>
    <owners>Jamma Ltd</owners>
    <requireLicenseAcceptance>false</requireLicenseAcceptance>
    <description>License file</description>
    <copyright>Copyright 2017</copyright>
  </metadata>
</package>
Important: Now move the dll into a subfolder named "lib"
Package the dll using nuget pack.
Add the package (jamma.dll and jamma.dll.nuspect) to your NuGet server however is appropriate, might just be copy/paste, or using nuget push commands. See the NuGet documentation.
Remove the reference from the project, and re-add from NuGet. Build and test. If everything's OK, delete the old jamma.dll file and folder.
Which would I do? Number 2, so that all my external dependencies are handled the same way (NuGet).
It's Building, so Add to CI
I test again by deleting and re-getting all the source code, open each and restore any NuGet packages, and build all the solutions. Everything builds, so I'm ready to configure TFS Build for continuous integration.
All my solutions are under the same team project. I'll need to be careful when I create my build definitions that I'm only checking out and building the solutions I want. The key to that is not saving the definition until its Repository and Triggers have been configured.
I'll create the first definition in detail, then just list settings for the remainders.
But first, the NuGet Package Source
If I haven't done it already, I'll add a machine-wide nuget configuration file that has my custom package source.
Create the file %ProgramData%\NuGet\Config\MySource.config with the source definition. In my case, I'm testing with a local NuGet server.
<?xml version="1.0" encoding="utf-8"?>
<configuration>
  <packageSources>
    <add key="NuGet Test Server" value="http://localhost:7275/" />
  </packageSources>
</configuration>
NameDb
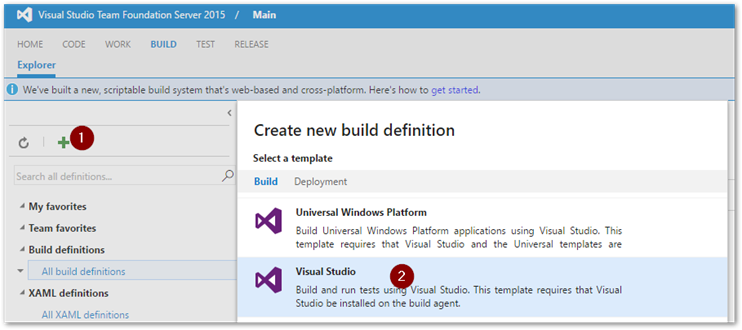
Let's start at the top with the simple one, NameDb. In TFS, navigate to the correct collection and the Main team project. Then open the Build tab, start a new build and choose the Visual Studio template.
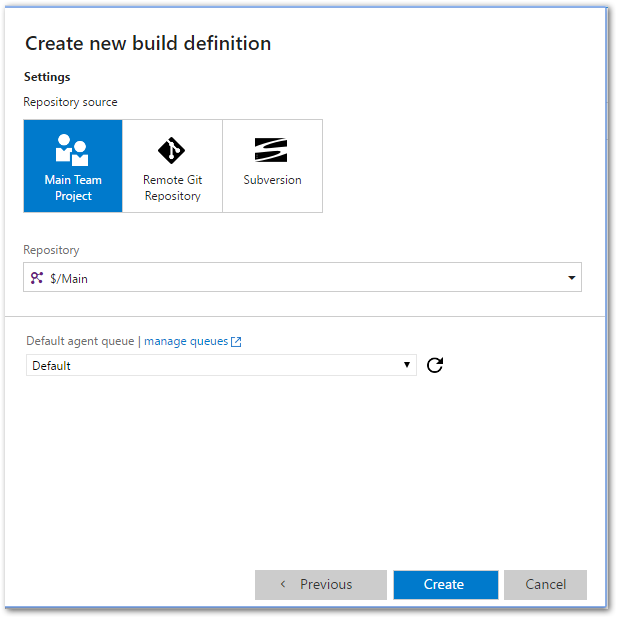
Create using the repository source Main Team Project.
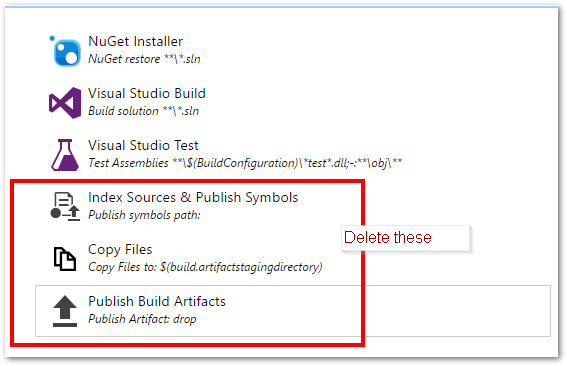
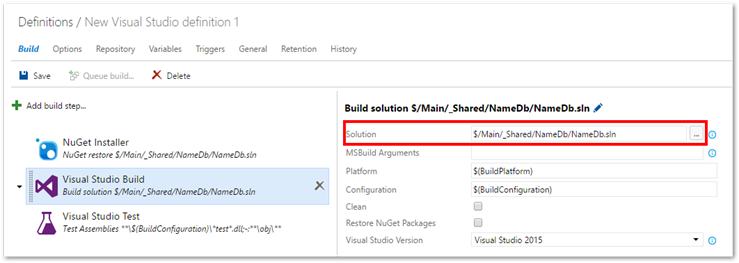
Delete the Index, Copy and Publish steps. I can add those back if we want them. I don't need the NuGet installer step, either, but I'll configure it as an example since the other projects need it.
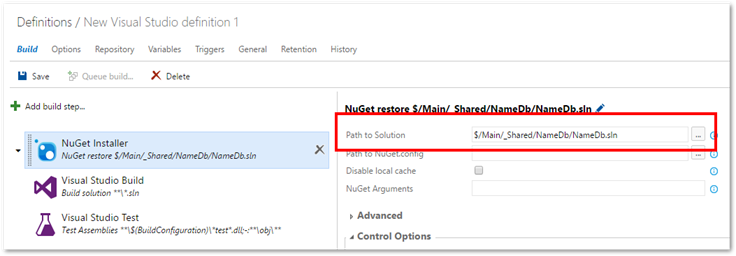
Set the NuGet Installer path to the NameDb solution file.
Set the Visual Studio Build path to the NameDb solution file.
Set the Visual Studio Test "Test Assembly" to the solution folder path. This is the physical folder where the agent will have pulled the files from TFS, the same as the LocalPath path we'll choose in Repository. The path definition means "Run any dll with "test" in its name under the build definition name, but not in the obj folders." Since our build definition will be Release, it'll run Release/NameDb.Tests.dll.
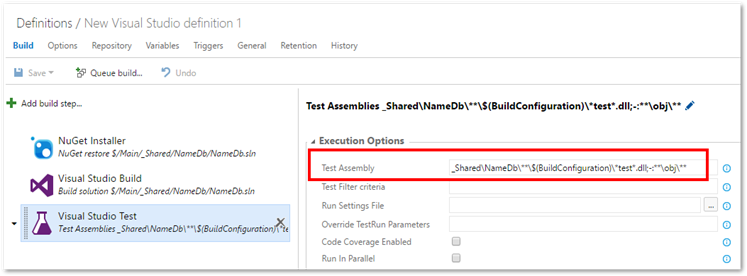
Do NOT Save!
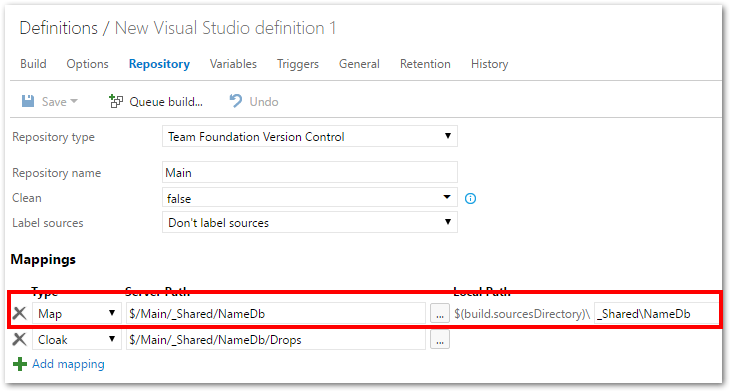
Change to the Repository tab. This controls what source code gets checked out by the build. Change the mapped paths. We'll keep the cloaked Drops folder, even though we aren't publishing anything yet.
Notice the LocalPath is set. This is so the contents of the NameDb solution folder are placed under a _Shared\NameDb folder, just like in the repository. It's not strictly needed for this build, but remember how this works if you're building multiple solutions with project dependencies in relative folders.
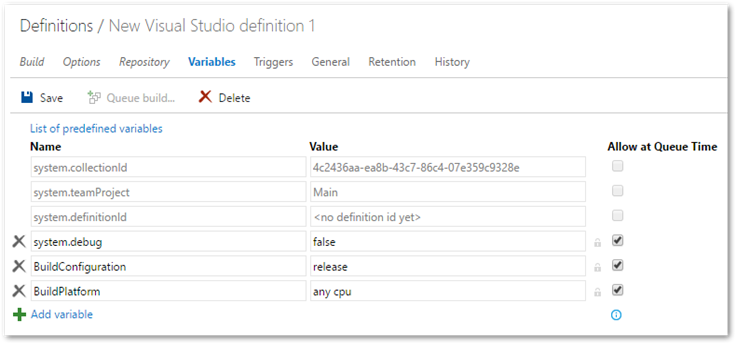
Change to the Variables tab and ensure the BuildConfiguration is "release".
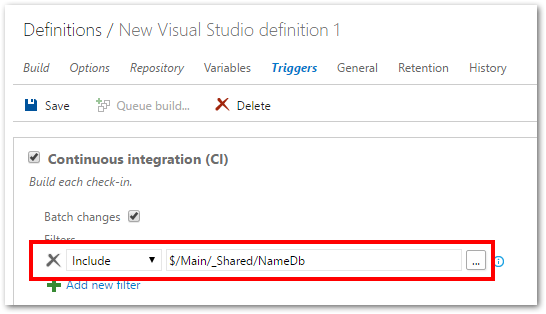
Change to the Triggers tab. This controls what starts a build. Check Continuous Integration and set the path to the NameDb folder. We only want to build if a file in NameDb changes.
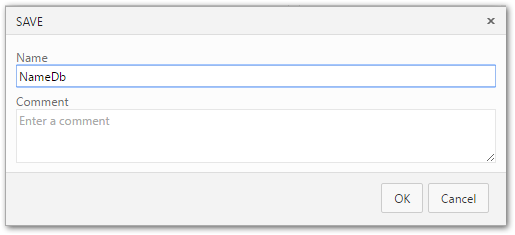
Now Save the definition and give it a good name like "DbName".
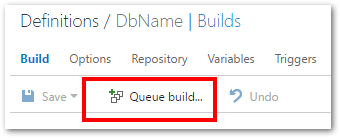
Finally, queue the build and see if it succeeds!
Important
Check each step's output for what you expect. Especially, check that tests ran! The test step will success even if it doesn't find tests!

For the next solutions, I'll just list the settings for the build definitions. All of them use the Visual Studio template, and only keep the NuGet, Build and Test steps.
ReverseIt
BUILD TAB
- NuGet Installer path to solution:
$/Main/ReverseIt/ReverseIt.sln
- Build solution path:
$/Main/ReverseIt/ReverseIt.sln
- Test assembly path:
ReverseIt\**\$(BuildConfiguration)\*test*.dll;-:**\obj\**
REPOSITORY TAB
- Map Server Path
$/Main/ReverseIt to Local Path ReverseIt
- Map Cloaked Path
$/Main/ReverseIt/Drops
VARIABLES TAB
- BuildConfiguration: release
TRIGGERS TAB
ReverseNames
Strictly speaking, I don't need to build RevEngine. Any changes I make will trigger ReverseIt to build, and if it fails then someone--hopefully I--will be notified. What I do need to do is get the source code into the correct relative folder, and install the NuGet packages. In short, I need to ensure RevEngine can be used by ReverseNames.
So, I'm going to have two sets of steps; one for RevEngine, and one for ReverseNames. It's a brittle definition: Whoever, works on RevEngine needs to know about this build, too, in case something needs to change.
BUILD TAB
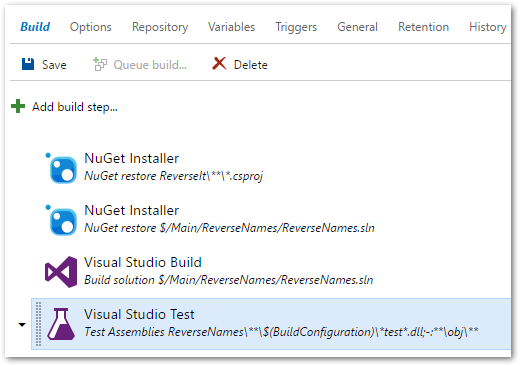
NuGet Installer RevEngine
- Path to solution:
ReverseIt\**\*.csproj
- NuGet Arguments:
-PackagesDirectory ..\packages
Notice I set the path to the local project files. This will restore packages for any .csproj file found. I also explicitly say where to put the packages folder relative to the .csproj file.
NuGet Installer ReverseNames
- Path to solution: $/Main/ReverseNames/ReverseNames.sln
Build ReverseNames
- Solution path: $/Main/ReverseNames/ReverseNames.sln
Test ReverseNames
- Assembly path:
ReverseNames\**\$(BuildConfiguration)\*test*.dll;-:**\obj\**
REPOSITORY TAB
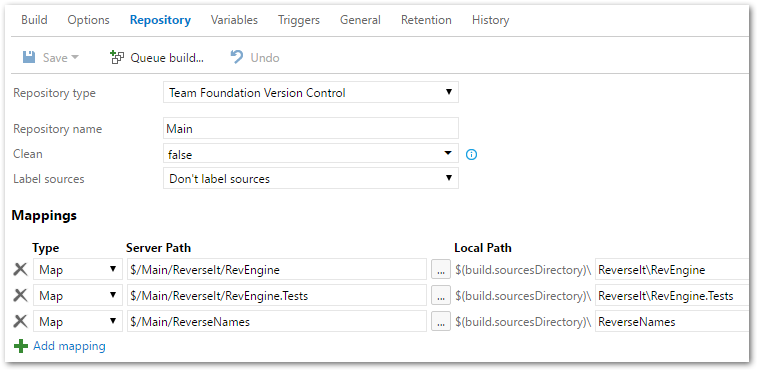
This is critical. I'm telling the build exactly which project folders to pull from ReverseIt, i.e. RevEngine and RevEngine.Tests. This way I don't pull and build ReverseIt.csproj.
If I add a test project later, I'll need to add its mapped path here. Note that I removed the Drops cloaked path since I don't need it.
- Map Server Path
$/Main/ReverseIt/RevEngine to Local Path ReverseIt\RevEngine
- Map Server Path
$/Main/ReverseIt/RevEngine.Tests to Local Path ReverseIt\RevEngine.Tests
- Map Server Path
$/Main/ReverseNames to Local Path ReverseNames
VARIABLES TAB
- BuildConfiguration: release
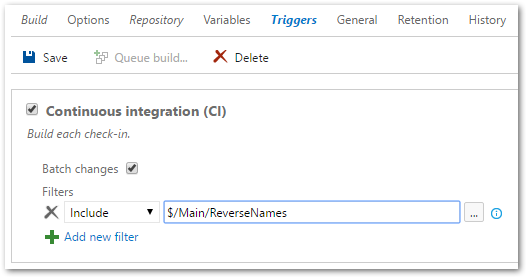
TRIGGERS TAB
I'm triggering the build if ReverseNames changes.
- Include
$/Main/ReverseNames
Here are some screenshots of the ReverseNames definition.
Improving the Solutions, Dependencies and Team Projects
What I've done so far works. Sort of. But it's not exactly ideal, especially if there were fifty solutions, not just three. One big thing I lose is the ability to maintain separate project boards and work items per project. To do that, I'd really like a separate Team Project per solution (or in some cases it could be multiple solutions).
The team projects might look like this.
$\NameDb
$\RevEngine
$\ReverseIt
$\ReverseNames
And then there's the project reference. The project reference is bound to cause headaches in the future. One developer will change RevEngine and silently break the ReverseNames build. I say "silently," because it could be something like adding a new unit test project that doesn't get run by ReverseNames because it doesn't get pulled from source control.
Because it's a shared dependency, RevEngine needs to be in its own solution under _Shared and published as a NuGet package.
Right about now, someone's saying, "But but but! I need to be able to step through that code! And make changes that I can test against ReverseIt!!"
This might point to too much coupling between the projects, but so what? That's what you need. For debugging,
If you really need to change code in the context of the solution,
- Drop the RevEngine NuGet reference from ReverseNames.
- Get the latest RevEngine code into its _Shared\RevEngine folder.
- Temporarily add the project reference to ReverseNames.
- Do the work.
- When finished, drop the RevEngine project reference.
- ReAdd the NuGet reference (which doesn't have your changes, sorry).
- Open the RevEngine solution and run the tests.
- Commit the RevEngine changes, which, sorry, need to be taken through QA, published, etc.
- When that's finished, update the RevEngine NuGet package in ReverseNames.
- Run the tests, commit, QA, etc.
In other words, you need to treat RevEngine as if it were some third party assembly like Entity Framework or NLog.
All of this leads to...
Key Thinking to Managing Dependencies
- Treat your dependencies as if they're third party.
- Shared dependencies need to be in their own solutions.
- What does it take to check out, build and test the solution on a new computer?
- How would you store the project(s) on GitHub or other public remote repository?
The Plan
I'm going to do just three things, but they'll make a big difference.
- Reorganize the solutions into discrete team projects
- Publish shared project references as NuGet packages
- Update projects to use the packages
Important
Before getting started in a production environment, I'd disable all of the affected TFS Build definitions. I don't want anything running if I don't need to.
I would also make a backup copy of all the affected source code, just in case something gets lost.
Reorganizing into Team Projects
First, I'll create my new team projects. Then I'll move my code.
Note
You can also add team projects using the Visual Studio Team Explorer.
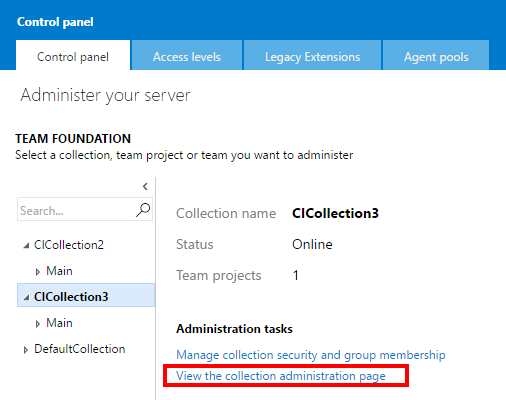
Open TFS in the browser, e.g. http://nesbit:8080/tfs. Or, if you know your collection's name, you can open it directly and skip to step 4. (e.g. http://nesbit:8080/tfs/CICollection3/_admin)
Click the upper right hand corner settings "gear" icon to open the Manage Server page.

Select the Collection holding your team projects, and click "View the collection administration page".
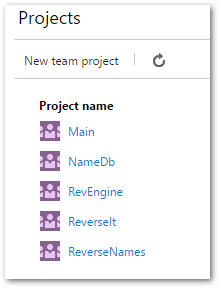
Click New Team Project, enter the information and Create.
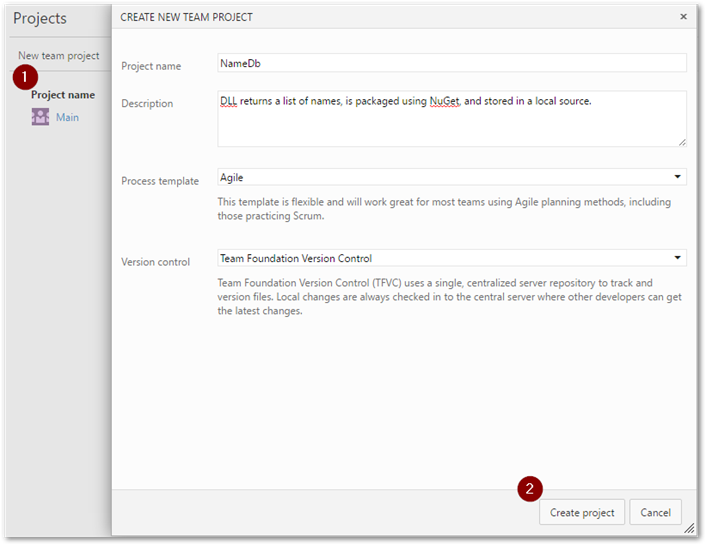
Repeat to create the four team projects.
We can't move the code using the TFS web application, so
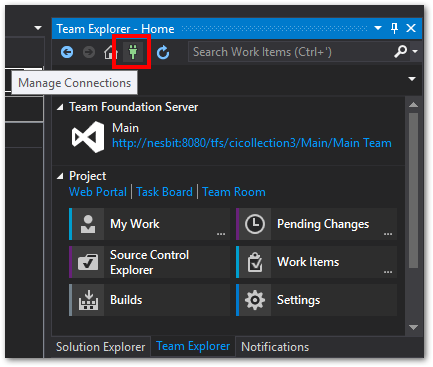
Open Visual Studio
Open Team Explorer and click the plug icon to Manage Connections
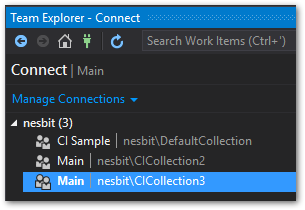
Double click the collection you're using to connect to it.
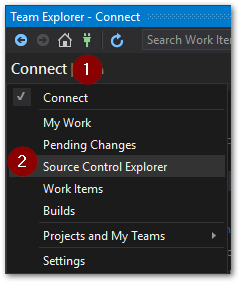
Open Source Control Explorer.
The new team project folders need to be mapped to local folders. This is kind of a pain, but with TFS Version Control there's no getting around it. It's easier with git. I would create a new folder named something like TempTeams to hold the new team projects, finish the moves, then delete all my source code mappings and start over. Like I said, a pain. Be very careful when doing all this that you don't accidentally delete source code from TFS you didn't want to.
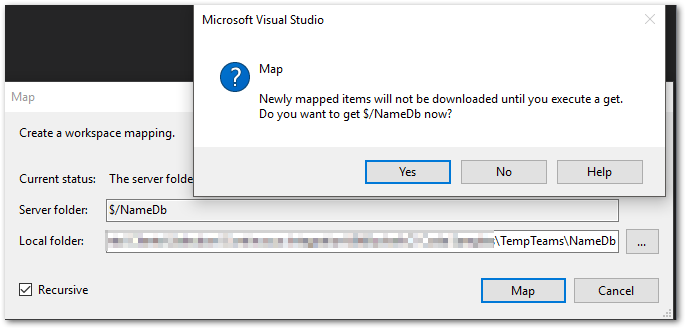
To map a team project folder, select it and click the Not Mapped link. Enter the destination folder, and when prompted Get the latest code (there won't be any, that's OK). Map all the team project folders.
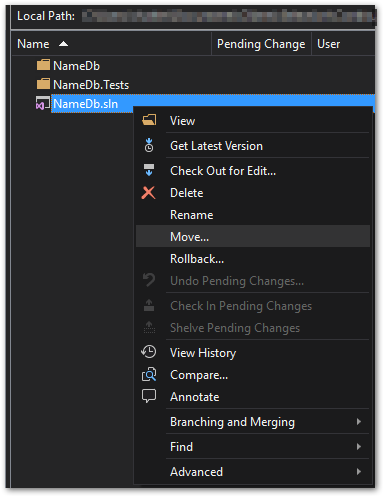
Open the NameDb solution. TFS still doesn't natively allow moving multiple files/folders at once, so we need to move the project contents one a time. First, I'll move the solution file. Right-click, select Move, and enter the NameDb team project. The file will be moved to the NameDb team project.
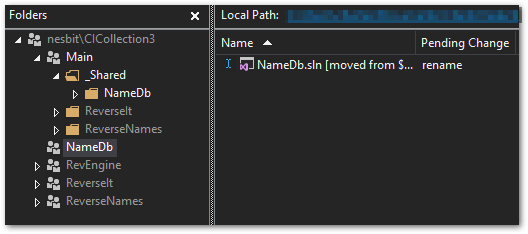
Move the NameDb and NameDb.Tests project folders the same way. You can right-click and move an entire folder, just not multiple folders.
When finished, Commit the changes.
You can now delete the NameDb folder from under $/Main/_Shared and commit that change.
Now I'm going to move just the RevEngine project folders to the new RevEngine team project. Later, I'll create their solution file.
Open the ReverseIt folder. Move the RevEngine and RevEngine.Test folders.


At this point, I move the remaining ReverseIt files/folders to their new team project. Likewise the ReverseNames solution.
Commit the changes. Delete the folders from $/Main, and commit that change, too.
Do NOT delete the $/Main team project! The TFS Build definitions would be deleted, too.!
Finally, go to the RevEngine project in your local working folder, i.e. ..TempTeams\RevEngine\RevEngine, open RevEngine.csproj. This will open the project in a solution, we just haven't saved the solution file yet.
Add the RevEngine.Tests project to the solution.
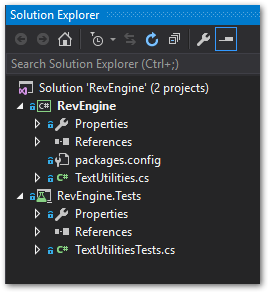
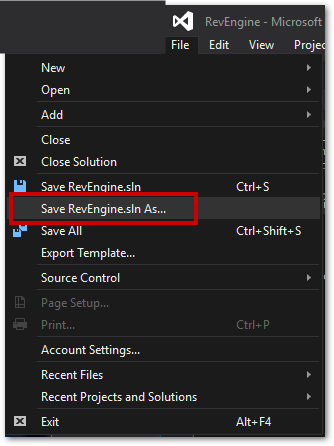
Now I have to be careful. I select the solution in Solution Explorer. Then, File > Save RevEngine.sln As.
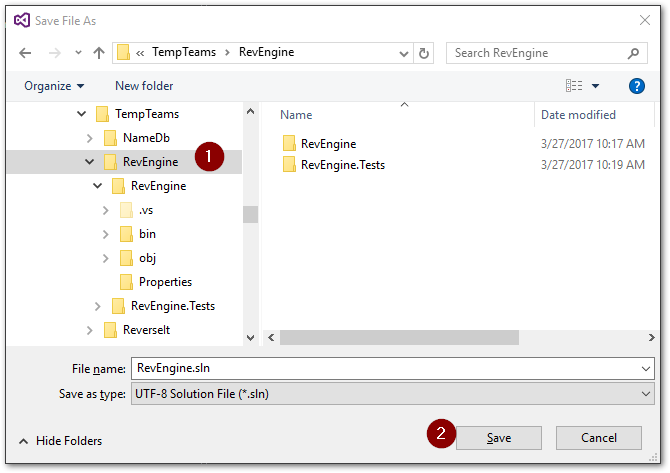
In the Save As dialog, I navigate up one folder, so my solution file is at the root of RevEngine.
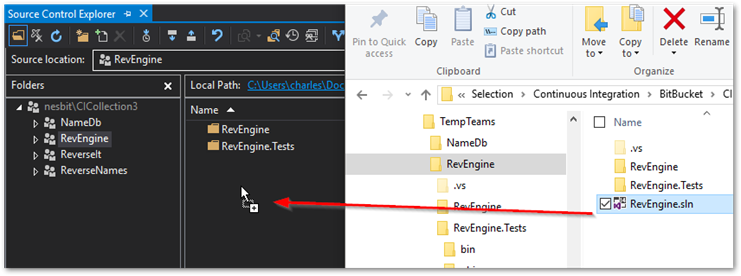
Now, I drag and drop the solution file into the Source Control Explorer's RevEngine team project.
Commit the change.
My projects are reorganized, and a couple will build (NameDb and RevEngine). Time to turn handle the RevEngine dependency.
Publish shared project references as NuGet packages
I'm still working in the TempTeams folder. I'll wait until everything's working before going back to my preferred folders.
Creating NuGet packages can be complex. For this walkthrough, I'm showing the simplest thing that works; I'm sure these steps are not ideal. The following assumes I have a local NuGet server at http://localhost:7275/nuget that doesn't require an API key for pushing packages (not recommended), and does allow pushing symbols.
Open the solution, and edit the RevEngine Project Properties > Application > Assembly Information.
Ensure Title, Description, Company and Product are filled in.
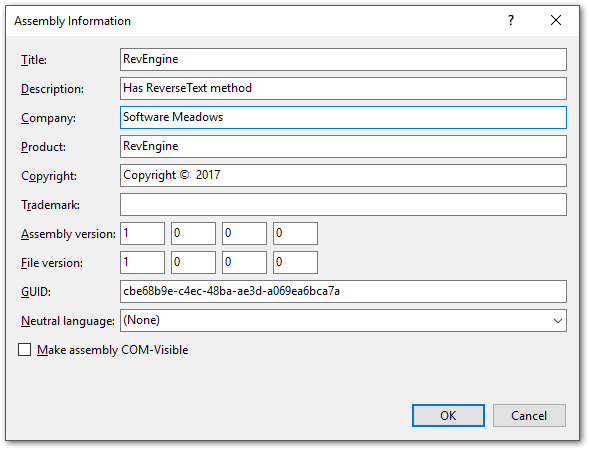
Save and build the solution. You must build, because nuget packs the built dll. It does not build the solution for you.
Download the latest recommended NuGet.exe file.
Put nuget.exe in the RevEngine project folder.
Open a command prompt and change directory to the RevEngine project folder.
Run nuget spec to create a RevEngine.nuspec file
Edit RevEngine.nuspec and make these changes:
<?xml version="1.0"?>
<package >
  <metadata>
    <id>$id$</id>
    <version>$version$</version>
    <title>$title$</title>
    <authors>$author$</authors>
    <owners>$author$</owners>
    <description>$description$</description>
  </metadata>
</package>
Run nuget pack -Symbols to create the regular and symbols package. Remember that, in our case, we want a symbols package so that we can step through the assembly without using a project reference.
Run nuget push *.nupkg -Source http://localhost:7275/api/v2/package. This will push both of the packages.
Update projects to use the packages
This one should be pretty easy. In any solution that has RevEngine as a project reference, remove the project and the reference, then install the NuGet package. Notice that jamma.dll is installed as well, because RevEngine depends on it and the RevEngine project was referencing the jamma.dll NuGet package when it was packages.
After updating, if I open ReverseIt (for example), put a breakpoint on this line,
Console.WriteLine(util.ReverseText(text));
then run the program, I can step into RevEngine.TextUtilities.cs, which is now part of the debugging symbols.
Update TFS Build Definitions
It's time to get our builds working again!
TFS doesn't natively support copying/moving build definitions. One solution is to write code using the TFS web API to clone definitions:
http://www.eidias.com/blog/2016/3/7/tfs-2015-cloneimportexport-build-definition-between-team-projects
However, there's a TFS extension for this, which really saves the day. You can download it here.
Export/Import Build Definitions
Note
If using TFS 2015, you must use version v0.0.2. Later versions only work with TFS 2017.
Follow the instructions to install the extension.
To install 'Export/Import Build Definition' (EIBD) on Team Foundation Server 2015 Update 2 and above, perform the following steps:
- Navigate to the Team Foundation Server Extensions page on your server. (For example, http://someserver:8080/tfs/_gallery/manage)
- Click Upload new extension and select the file you have just downloaded.
- After the extension has successfully uploaded, click Install and select the Team Project Collection to install into.
To move NameDb:
In the Main team project Build tab, right-click the build definition and choose Export. Save the json file to a folder such as TfsBuildExports.
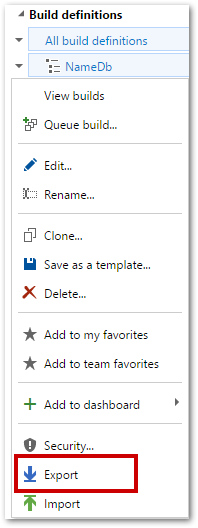
Change to the NameDb team project Build tab. EIBD has a known limitation: the Export/Import menu items can only be seen on a build definition name, not the "All build definitions" item. So, if necessary, create an empty definition and save it with a non-conflicting name.
Right-click a definition and choose Import, selecting the .json file.
Edit the imported definition.
Make the following changes.
BUILD
- NuGet Installer path: $/NameDb/NameDb.sln
- Build path: $/NameDb/NameDb.sln
- Test path: *$(BuildConfiguration)*test.dll;-:*\obj*
REPOSITORY
TRIGGERS
- Test!
ReverseIt
Use the same approach as NameDb, namely changing the paths in Build, Repository and Triggers. (In fact, ReverseIt would work with the default Visual Studio template.)
ReverseNames
Likewise, ReverseNames can be simplified because I no longer have the RevEngine project to deal with. In fact, all I have to do is delete anything related to RevEngine, then update the remaining paths as I've done above.
RevEngine
This is a new build definition, and it follows the same simplified pattern as above.
What Just Happened?
I'll tell you what. Our build definitions got simpler because
- We converted our project references to NuGet packages.
- We contained our code in team projects.
Admittedly, the sample was a pretty simple case. I could have a team project that legitimately encompasses multiple solutions. But if I still apply the key principles from above, I can have clean maintenance and simpler builds. As a bonus, it should be much easier to switch to git if I want, since I'm now treating my code as discrete instead of monolithic.
Clean Up
I can now delete the $/Main team project. But, despite there being a right-click menu item, I can't do it from Source Control Explorer. So, (sigh), back to the web interface and my collection administration page. Select Delete from the dropdown to the left of the team project.
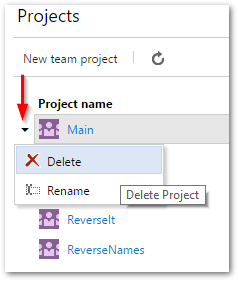
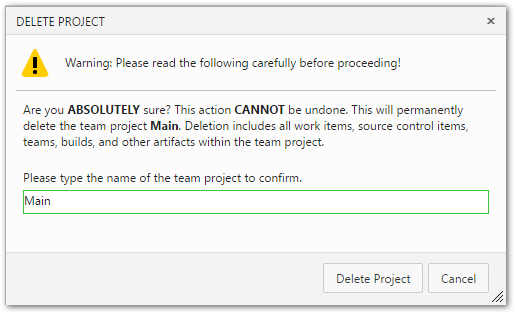
Am I sure the team project is empty? If so, enter its name and delete it.
References
Creating a Package
Configuring NuGet Behavior
Using Private NuGet Repository
How to Get TFS2015 Build to Restore from Custom NuGet Source 1
How to Get TFS2015 Build to Restore from Custom NuGet Source 2
NuGet Package Source Config Locations Introducing NuGet 4 Specifying NuGet Config path for TFS Build
Next Part: TFS Continuous Integration Walk Through Part 5d - Multiple Solutions: Build Settings

