Creating Forms Authentication Membership Tables in LocalDB–Right and Wrong Ways
2016-10-22 15:50
The Problem
There’s a rare chance these days that you’ll need to manually create the authentication tables used by the old ASP.NET WebForms Forms Authentication Membership Provider. The tool to do this is aspnet_regsql.exe , found in the .Net Framework folders.
Even rarer will be using the tool to create the tables in LocalDB. You don’t really have to. The database will be automatically created, even in Visual Studio 2015, if you do the steps at the end of the article.
The Wrong Way
But let’s say you do use the tools, as in this command line for Windows 64-bit.
%windir%\Microsoft.NET\Framework64\v4.0.30319\aspnet_regsql.exe -E -S (LocalDB)\v11.0 -d aspnetdb -A mr
Assuming you have the SQL 2012 LocalDB installed, running the above will create a file in your user profile named aspnet.mdf, for example C:\Users\charles\aspnetdb.mdf.
Here’s the rub. If you delete the file, then run the command again, you’ll get this error.
An error occurred during the execution of the SQL file 'InstallCommon.sql'. The SQL error number is 5120 and the SqlException message is: Unable to open the physical file "C:\Users\charles\aspnetdb.mdf".
This happens because LocalDB is still storing an entry in sys.databases (in the master database) for the database you just created. In my opinion, it shouldn’t, but what do I know?
Cleaning Up from the Wrong Way
To remove this entry, you need to delete the entry by connecting to LocalDB like a server. These instructions show using Visual Studio’s database tools, but the steps are similar for SQL Management Studio.
- Open Visual Studio
- You don’t need to create a project. Just Tools > Connect to Database.

- Choose Data source = Microsoft SQL Server
- Enter Server name = (LocalDB)\v11.0
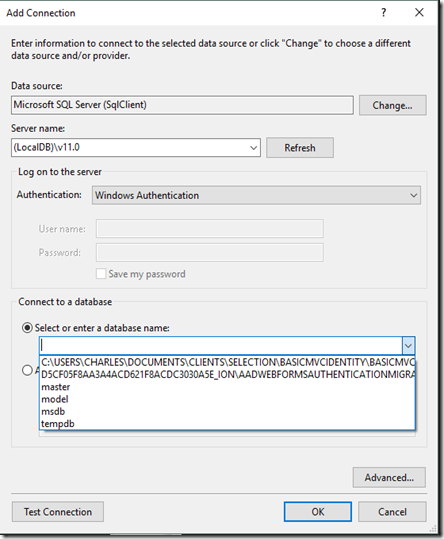
- Drop down the list of databases. You should at least see master, etc.

- You will not see aspnetdb. Choose the master database.
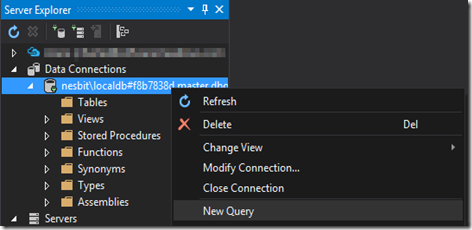
- Open the Server Explorer, right-click the connection and choose New Query.

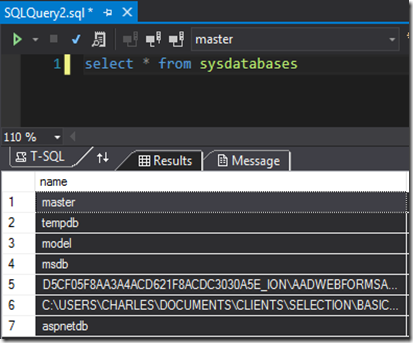
- In the query window, enter and run:
select * from sysdatabases - You’ll see aspnetdb listed.

- Run this command:
drop database aspnetdb - You’ll get an error message:
Unable to open the physical file "C:\Users\charles\aspnetdb.mdf". Operating system error 2: "2(The system cannot find the file specified.)".
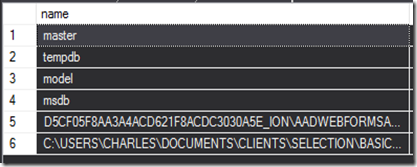
File activation failure. The physical file name "C:\Users\charles\aspnetdb_log.ldf" may be incorrect. - But that’s OK. If you select from sysdatabases again, you’ll see the aspnetdb has been removed.

Creating the Database the Right (Easy) Way
I didn’t find documentation saying I could do this, and tried it on a whim. Basically, if you configure your project to use a LocalDB as your membership provider, the first time the app tries to use it the database will be created with the correct tables. At least, this is true in Visual Studio 2015.
Add Old-Style Forms Authentication
Web.Config
Open web.config. Under <configuration>, add this connection string.
  <connectionStrings>
    <!-- ASP.NET MembershipProvider-->
    <add name="ASPNETDB" connectionString="Data Source=(LocalDB)\v11.0; Integrated Security=true;AttachDbFileName=|DataDirectory|ASPNETDB.mdf" providerName="System.Data.SqlClient" />
  </connectionStrings>
In <system.web>, add this.
     <!--ASP.NET MembershipProvider, must be None for other providers such as OWIN-->
    <authentication mode="Forms">
      <forms loginUrl="~/" timeout="2880" />
    </authentication>
    <membership defaultProvider="AspNetSqlMembershipProvider">
      <providers>
        <clear />
        <add name="AspNetSqlMembershipProvider" type="System.Web.Security.SqlMembershipProvider" connectionStringName="ASPNETDB" enablePasswordRetrieval="false" enablePasswordReset="true" requiresQuestionAndAnswer="false" requiresUniqueEmail="false" maxInvalidPasswordAttempts="5" minRequiredPasswordLength="6" minRequiredNonalphanumericCharacters="0" passwordAttemptWindow="10" applicationName="/" />
      </providers>
    </membership>
    <!--Set enabled to false for OWIN-->
    <roleManager enabled="true" defaultProvider="AspNetWindowsTokenRoleProvider">
      <providers>
        <clear />
        <add name="AspNetSqlRoleProvider" type="System.Web.Security.SqlRoleProvider" connectionStringName="ASPNETDB" applicationName="/" />
        <add name="AspNetWindowsTokenRoleProvider" type="System.Web.Security.WindowsTokenRoleProvider" applicationName="/" />
      </providers>
    </roleManager>
Create the Membership Database
In Default.aspx.cs
Add these using statements.
//MembershipProvider (forms authentication)
using System.Security.Principal;
using System.Web.Security;
In some part of your app’s startup, add this code, which we'll run once to create the database, add a user, and add a role. For example, this could go in a Web Form’s Page_Load, in a Controller action, or in a console app’s Main. You could, of course, not create a role, or delete the user afterward, etc.
            string email = "charles@aspnetmembership.com";
            string role = "Dev";

            Membership.CreateUser(email, "BadPassword!", email);
            if (!Roles.RoleExists(role))
            {
                Roles.CreateRole(role);
            }
            Roles.AddUserToRole(email, role);
Run the project. The aspnetdb.mdf database file will be created in App_Data, with the needed tables.
Delete the code added above.
