The 50-10 Time Box - Revising Pomodoro for Software Development
2018-04-21 07:50

I've been resolving three aspects of programming:
- The cost of interruptions
- Methods for staying on task
- The benefits of taking breaks
Each of these has studies behind it (see References), as well as anecdotal information. The simple question I wanted to answer is:
What's an effective work-break cycle for programming?
The three most common cycles I know of are:
- Pomodoro - 25 minutes work, 5 minutes break
- 52/17 - 52 minutes work, 17 minutes break
- 90/? - 90 minutes work, then a break
Pomodoro
The Pomodoro Technique is popular, and, besides the work-break cycle, has these suggestions:
- Plan the tasks
- Check off completed tasks
- Record interruptions so you can return to them outside the work interval
The problem is, Pomodoro, to my knowledge, hasn't been studied scientifically. When I used it for non-programming tasks, I could see the benefit. The more I tried using it for programming, the less effective I found it.
The Task Recovery Lag
Numerous studies show there's a recovery lag when resuming an interrupted task. For software developers, it takes about fifteen minutes to recover the previous context--to "get back to where I was." The worst time to be interrupted is when there's the highest mental workload. (Like when I'm in the middle of debugging a method having spent twenty minutes understanding how it relates to five other modules.)
I think it's a mistake, though, to think only in terms of interruptions. A programmer always ramps up when starting (or restarting) a coding session. In other words, we should plan on the first fifteen minutes being devoted to recovering context.
Breaks
I've worked for hours straight, and thought I was being productive. Maybe sometimes I was. But the research shows that regular breaks improve productivity, because the brain needs that time to recover from fatigue.
The Friction
So, where does that leave us regarding Pomodoro?
- It takes a programmer at least fifteen minutes to "ramp up"
- A Pomodoro work period is twenty-five minutes
- That leaves ten minutes or less of effective work time
Well, no wonder Pomodoro wasn't working out!
I have tried the 52/17 cycle. I found the seventeen minute break too long. I read an article where office workers tried it themselves, and it was pretty challenging. I suspect that the original study wasn't looking at programmers....
There are benefits to Pomodoro. The task planning and completion help a lot with emotionally attaching to success, and with chunking down larger items.
Proposal - The 50-10 Time Box
I've been trying this for about a month now, and it's working well for me. So, maybe it will work for you, too. Basically, use Pomodoro Technique but with a 50 minute work cycle followed by a ten minute break. This allows for the fifteen minute ramp up, then thirty-five minutes of solid, focused work. I've found that I'm usually ready for a break at the fifty minute mark.
Even if I wasn't "ready" for a break, when I took it I found I needed it.
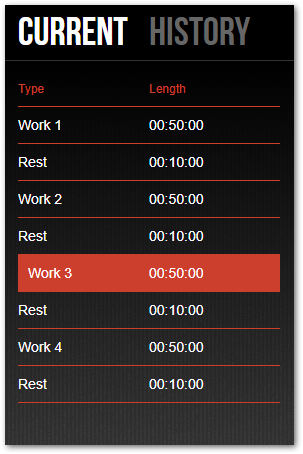
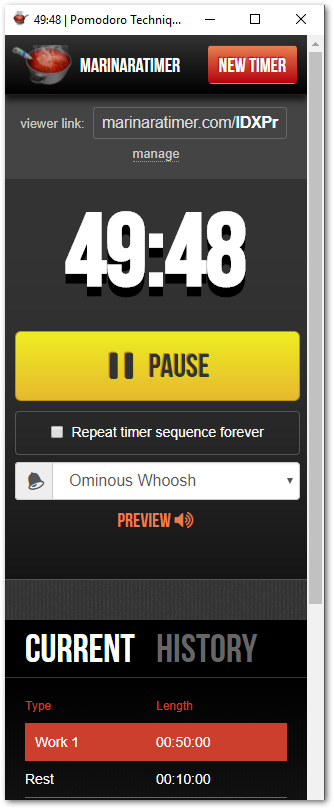
I use an online tool named Marinara Timer to manage my time boxes. It has a Custom timer where I configured my cycles.
What do I like about this approach?
- It aligns on the hour, making it easy to understand.
- I get enough context recovery time.
- Four cycles gets me to lunch, the remaing four finish my day.
- A ten minute break is enough to take a walk, catch up on email, even have a short conversation. It's an effective coding break.
- That break has often helped me solve a thorny problem.
- Improves my task estimates.
A complete work session looks like this. I use a Markdown document to track my work sessions, distractions and notes, but paper and pen (or pencil!) would work as well or better.
1. Plan my tasks.
# Distractions

# Round 1
- [ ] Validation rules
- [ ] Unit tests

# Round 2
- [ ] Review code, make sure setting values correctly
- [ ] Improve queries based on understanding of rules

# Round 3
- [ ] Design workhorse feature

# Round 4
- [ ] Begin coding workhorse feature
2. Start my timer.
3. Work deliberately, with intense focus. Record distractions.
It's important to not noodle around during the work time. Manage distractions! This is a hallmark of deliberate practice, and an aspect of meditation and mindfulness.
# Distractions
- [ ] Email from Luis, not urgent but should get back to him soon.
- [ ] Birthday gift research for Joanie.

# Round 1
- [ ] Validation rules
- [ ] Unit tests
4. Check off tasks
# Distractions
- [ ] Email from Luis, not urgent but should get back to him soon.
- [ ] Birthday gift research for Joanie.

# Round 1
- [x] Validation rules
- [ ] Unit tests
4. When the work cycle ends (I'm currently enamoured of the Whoosh sound), take a break.
It can be hard to stop, but do it. And, I recommend walking away from the desk, and/or closing your work windows, so you don't get sucked back into the task.
5. Repeat.
Conclusion
I was spurred to write this post because of this article. The author, Tyler Hakes, gives several examples from his workday of how he reduces interruptions in his day, and it's worth reading.
Below are a bunch of references I read both before and while creating this entry. They include links to the primary research papers that other articles refer to. I've called out some quotes that I found useful.
References
Articles
- Time Blocking for Developers: How to Achieve Flow, Stop Being “Busy”, & Start Being Productive
- Programmer Interrupted A key article by a researcher whose study is often cited
- Worker, Interrupted: The Cost of Task Switching
- How Long It Takes to Get Back on Track After a Distraction
- Programmers, Teach Non-Geeks The True Cost of Interruptions
- The Cost of Distractions on Developers!
- The Pomodoro Technique And 3 More Research-Backed Study Tips
- How the Most Productive People Schedule Their Day - The Rule of 52 and 17
- The 90-Minute Solution: How Building in Periods of Renewal Can Change Your Work and Your Life
- ou’ve Been Taking Breaks All Wrong. Here’s How To Do It Right.
- 5 Science-Backed Ways Taking a Break Boosts Our Productivity
- Pomodoro Technique
Papers
When resuming an incomplete programming task, the developer must remember their previous working state and recover knowledge about the software. Details of working state might include recalling plans, intentions, and goals. Details of knowledge might include plan progress, component mechanisms, and domain representations.
Our data suggests that people compensate for interruptions by working faster, but this comes at a price: experiencing more stress, higher frustration, time pressure and effort.
- Disruption and Recovery of Computing Tasks: Field Study, Analysis, and Directions
- Just a minute never is
DeMarco reports that the recovery time after a phone call is at least 15 minutes.2 Even though we could not measure recovery time exactly, we believe his estimate to be valid. If more than 10 interrupts occur during a day, the time between the interrupts becomes too short to accomplish product development work.
Work fragmentation as result of interruptions usually demands extra effort to recover and resume pending activities: a study of 24 information workers found that a worker needs on average 25 minutes to get back on an interrupted task [5]. Similarly, Iqbal and Horvitz [6] found that people experience disorientation and loss of context when multitasking. Czerwinsky et al. found that after experiencing work fragmentation people found it more difficult to perform interrupted tasks and took longer to complete them [7].