A pleasant walk through computing

Comment for me? Send an email. I might even update the post!

Announcing DeepShadow

an assembly to help generate unit test data from Entity Framework

NuGet and Source

Introduction

DeepShadow helps solve a specific yet common use case: the developer needs unit test data from complex models, and wishes she could use actual data with some modifications.

What if she could do this?

db.Customers.Take(2).GenerateEntitiesFromList(toConsole: true);

or this?

File.WriteAllText("MockData.txt", db.Customers.Take(2).GenerateEntitiesFromList());

And get something like this?

List<DeepShadowDbContext.Customer> list = new List<DeepShadowDbContext.Customer>();

DeepShadowDbContext.Customer a1 = new DeepShadowDbContext.Customer();
a1.CustomerId = 1;
a1.Name = @"Nicolo Paganini";
a1.Codes = new List<String>();
a1.Codes.Add("A1");
a1.Codes.Add("A2");
a1.Codes.Add("A3");
a1.Orders = new List<DeepShadowDbContext.Order>();
list.Add(a1);
DeepShadowDbContext.Customer a2 = new DeepShadowDbContext.Customer();
a2.CustomerId = 2;
a2.Name = @"Hilary Hahn";
a2.Codes = new List<String>();
a2.Codes.Add("A1");
a2.Codes.Add("A2");
a2.Codes.Add("A3");
a2.Orders = new List<DeepShadowDbContext.Order>();
list.Add(a2);

return list;

The Problem

Here are relatively simple parent-child domain classes. They map to SQL tables, and the application is using Entity Framework.

    public class Customer
    {
        public int CustomerId { get; set; }
        public string Name { get; set; }
        public List<string> Codes {get;set;}
        //Nav
        public List<Order> Orders { get; set; } = new List<Order>();
    }

    public class Order
    {
        public int OrderId { get; set; }
        public int CustomerId { get; set; }
        public DateTime OrderedOn { get; set; }
        public decimal? Discount { get; set; }
        //Nav
        public Customer Customer { get; set; }
    }

You might need to test a Web API that itself calls a service. The model that comes back from the service includes related classes (i.e. Navigation Properties).

    public class CustomersController : ApiController
    {
        ICustomerService _customerService = null;

        public CustomersController(ICustomerService customerSerivce) 
        {
            _customerService = customerService
        }
        
        //GET api/customers
        public List<CustomerViewModel> Get()
        {
            //Returns all orders for each customer
            List<Customer> customers = _customerService.GetAllCustomers();
            
            List<CustomerViewModel> model = new List<CustomerViewModel>();
            
            foreach (var customer in customers)
            {
                CustomerViewModel custViewModel = new CustomerViewModel()
                {
                    //transform to the view model
                    AllCapsName = customer.Name.ToUpper();
                    CodeList = String.Join(" ", customer.Codes);
                    Orders = customer.Orders.Select(a => new OrderViewModel() 
                    {
                      //likewise transform orders to the view model  
                    });
                }
                model.Add(custViewModel);
            }
            return Content(model);
        }
    }

You're not testing the service, but you need to be sure that the Customer/Order properties map correctly to the View Model properties. You don't want to find out in production you set the CustomerViewModel.CodeList property to Customer.Name.

A simplistic unit test might look like this (NOT a working example!):

    
    [TestMethod]
    public void TestMethod1()
    {
        ICustomerService mockService = new MockCustomerService();
        mockService.TestCustomers = MockData.CustomersAndOrders;
        var controller = new CustomersController(mockService);
        var actual = controller.Get();
        Assert.AreEqual(mockService.TestCustomers.Count(), actual.Count());
    }

The mock service could be as simple as this, if you didn't want to use a mocking framework. Each test can set what customers/orders it wants to use.

    
    public class CustomerSerivce: ICustomerService
    {
        public List<Customer> TestCustomers {get; set;}
        
        public List<Customer> GetAllCustomers() 
        {
            return TestCustomers;
        }
    }
    

So, great, but what about the actual test data? In many cases, it's OK to hand-craft what you need, like this:

    Customer customer = new Customer()
    {
        CustomerId = 1,
        Name = "blamo",
        Codes = new List<string> {"a","b"},
        Orders = new List<Order>()
        {
            new Order()
            {
                OrderId = 11,
                CustomerId = 1,
                OrderedOn = DateTime.Parse("1/1/2001"),
                Discount = 10.00m,
                Customer = this
            }
        }
    }

But what if you have classes with twenty or thirty properties? And what if those properties have some domain-specific data or formats that need careful testing?

Customer.ID = {820bd7ae-fed3-419f-b778-8a817b45a968}
Customer.Name = Lewellen-Taft-O'Brien Marketing, LLC.
Customer.DiscountMatrix = 15.00|13.25|10.973
etc.

It's both tedious and error-prone to fabricate values like that when excellent test data is right there in the database! And, you already have code in the service to return that data. You just want to generate code to recreate the data in memory.

Enter DeepShadow

With DeepShadow, you can potentially generate your models as simply as this:

//This is an Entity Framework DbContext
MyDb db = new MyDb();

//REQUIRED FOR Mock Data Generation
db.Configuration.ProxyCreationEnabled = false;

//Generate a list of models
db.Customers.Take(5).GenerateEntitiesFromList(toConsole: true);

//Generate from a single entity
db.Customers.First().GenerateEntitiesFromObject(toConsole: true);

The output will look like this:

List<DeepShadowDbContext.Customer> list = new List<DeepShadowDbContext.Customer>();

DeepShadowDbContext.Customer a1 = new DeepShadowDbContext.Customer();
a1.CustomerId = 1;
a1.Name = @"Nicolo Paganini";
a1.Codes = new List<String>();
a1.Codes.Add("A1");
a1.Codes.Add("A2");
a1.Codes.Add("A3");
a1.Orders = new List<DeepShadowDbContext.Order>();
list.Add(a1);
DeepShadowDbContext.Customer a2 = new DeepShadowDbContext.Customer();
a2.CustomerId = 2;
a2.Name = @"Hilary Hahn";
a2.Codes = new List<String>();
a2.Codes.Add("A1");
a2.Codes.Add("A2");
a2.Codes.Add("A3");
a2.Orders = new List<DeepShadowDbContext.Order>();
list.Add(a2);

return list;

You'd put the above in some kind of unit testing MockData class, which is used to set the mock service method's return value.

public static class MockData
{
    public static List<Customer> CustomersAndOrders
    {
        get {
            List<DeepShadowDbContext.Customer> list = new List<DeepShadowDbContext.Customer>();
            //data
            return list;
        }
    }
}

Masking Data

Often you'll want to retrieve data from your database, but obscure sensitive data. That's easy enough in most cases without any help from DeepShadow.

//This is an Entity Framework DbContext
MyDb db = new MyDb();

//REQUIRED FOR Mock Data Generation
db.Configuration.ProxyCreationEnabled = false;

var employees = db.Employees.Where(a => a.Inactive == true).ToList();

//mask data
foreach (var employee in employees )
{
    employee.SSN = "111-22-3456";
    employee.DateOfBirth = DateTime.Parse("1/1/2001");
}

//Generate a list of models
employees.GenerateEntitiesFromList(toConsole: true);

Complete Example

I use (and recommend) the registered version of LINQPad for generating the data, though you could also create a console app to do it. The code's almost exactly the same. In this example, I've created a SQL database named DeepShadowSample, and a console application with an Entity Framework DbContext named DeepShadowDb.

Important
If you're using LINQPad, you must have a registered version in order to easily install the NuGet package.

Table Schema and Data

create table Customers
(
	CustomerId int not null primary key,
	Name varchar(max)
)

create table Codes
(
	Id int identity primary key,
	Name varchar(max)
)

create table Orders
(
	OrderId int not null primary key,
	CustomerId int not null foreign key references Customers(CustomerId),
	OrderedOn datetime not null,
	Discount decimal null
)


insert Customers select 1, 'Nicolo Paganini'
insert Customers select 2, 'Jasha Heifetz'
insert Customers select 3, 'Erica Morini'
insert Customers select 4, 'Hilary Hahn'

insert Orders select 2, 1, '2001-01-01', 10
insert Orders select 3, 2, '2002-01-01', 0
insert Orders select 4, 2, '2002-02-02', 5
insert Orders select 5, 3, '2012-05-23', 0
insert Orders select 6, 3, '2012-05-23 12:00:00.000', NULL
insert Orders select 7, 3, '2012-05-24', 0
insert Orders select 9, 4, '2015-12-12', NULL
insert Orders select 10, 4, '2017-12-15', 3

insert Codes (Name) values ('A1,A2,A3')
insert Codes (Name) values ('B4,B7')

DeepShadowDbContext Console App

using System;
using System.Collections.Generic;
using System.Linq;
using System.Data.Entity;

namespace DeepShadowDbContext
{
    class Program
    {
        static void Main(string[] args)
        {            
            var service = new CustomerService(new DeepShadowDb());
            Console.WriteLine(service.GetAllCustomers().Count()); //should return 4
            Console.ReadLine();
        }
    }

    public class CustomerService
    {
        DeepShadowDb _db;

        public CustomerService(DeepShadowDb db)
        {
            _db = db;
        }

        public List<Customer> GetAllCustomers()
        {
            var customers = _db.Customers.ToList();
            var codes = _db.Codes.First();
            foreach (var customer in customers)
            {
                customer.Codes = codes.Name.Split(',').ToList();
            }
            return customers;
        }
    }

    public class Customer
    {
        public int CustomerId { get; set; }
        public string Name { get; set; }
        public List<string> Codes { get; set; }
        //Navigation
        public List<Order> Orders { get; set; } = new List<Order>();
    }

    public class Order
    {
        public int OrderId { get; set; }
        public int CustomerId { get; set; }
        public DateTime OrderedOn { get; set; }
        public decimal? Discount { get; set; }
        //Navigation
        public Customer Customer { get; set; }
    }

    public class Code
    {
        public int Id { get; set; }
        public string Name { get; set; }
    }

    public class DeepShadowDb : DbContext
    {
        public DbSet<Customer> Customers { get; set; }
        public DbSet<Order> Order { get; set; }
        public DbSet<Code> Codes { get; set; }

        protected override void OnModelCreating(DbModelBuilder modelBuilder)
        {
            modelBuilder.Entity<Customer>().Ignore(a => a.Codes);
        }
    }
}

App.Config

<?xml version="1.0" encoding="utf-8"?>
<configuration>
  <configSections>
  </configSections>
  <startup>
    <supportedRuntime version="v4.0" sku=".NETFramework,Version=v4.6.1" />
  </startup>
  <connectionStrings>
    <add name="DeepShadowDb" 
         connectionString="Server=.\SQLEXPRESS2016;Database=DeepShadowSample;Trusted_Connection=True;"
         providerName="System.Data.SqlClient"/>
  </connectionStrings>
</configuration>

1. Open LINQPad to a new C# Statements query

2. Add Entity Framework connection

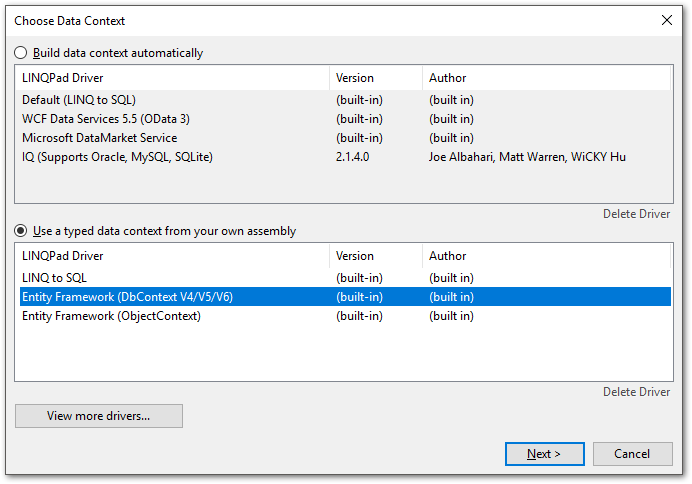
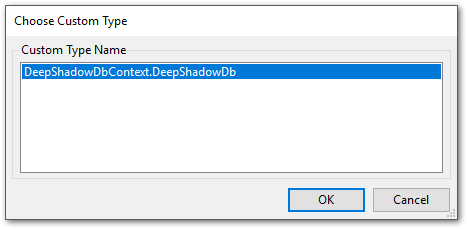
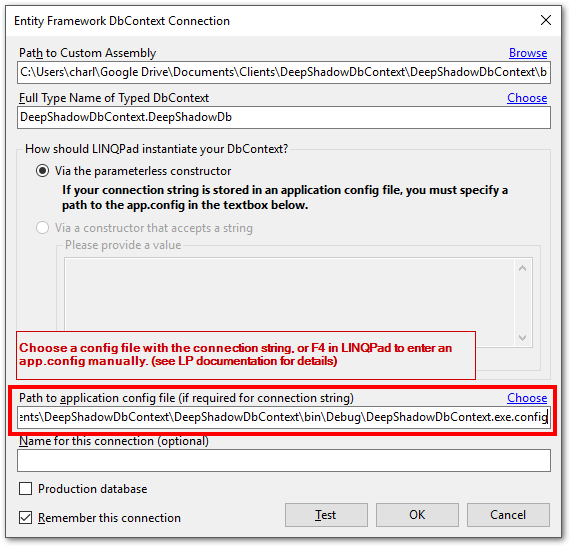
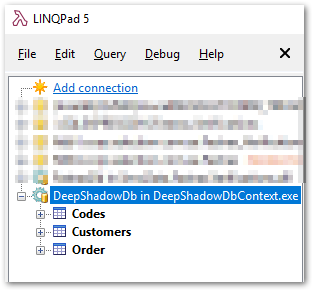
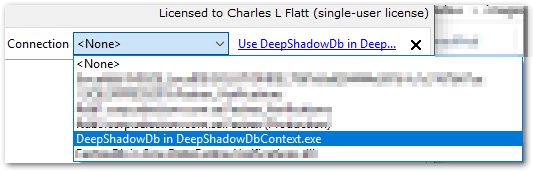
3. Set the query connection

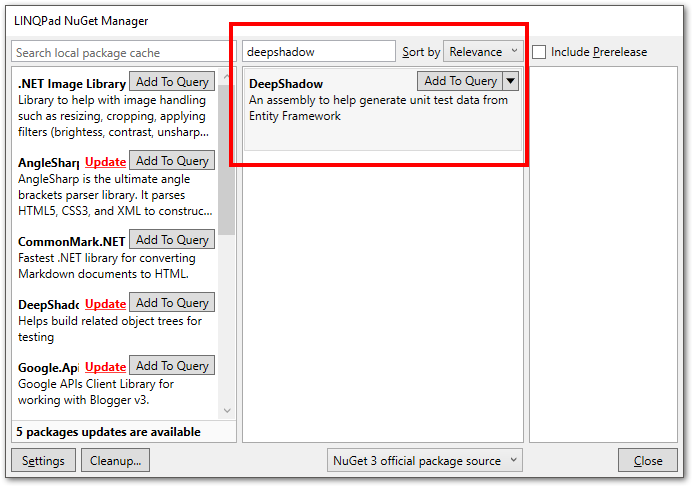
4. Press F4 to open the query settings, and click Add NuGet

5. Search online for DeepShadow, and add to query

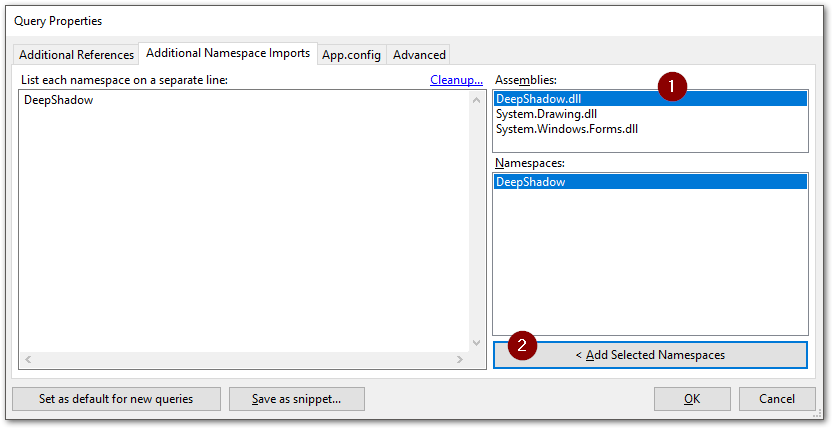
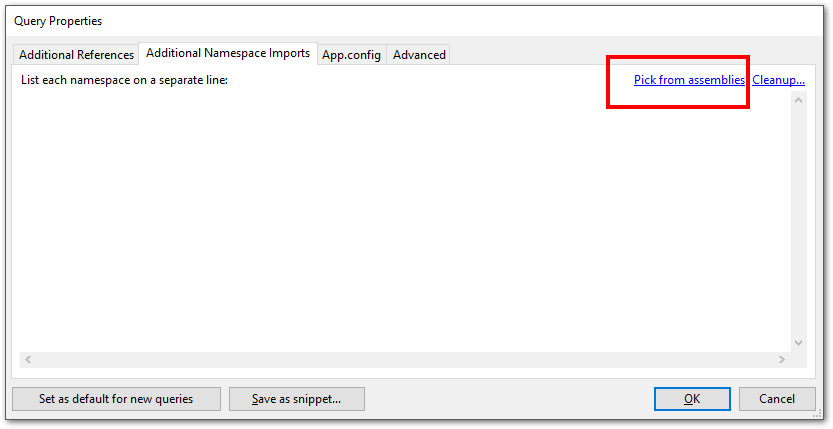
6. In the Query Properties window, Additional Namespace Imports tab, click Pick from assemblies and add the DeepShadow namespace.

7. In the query window, add this code. Notice how it's essentially copy/paste from CustomerService.GetAllCustomers.

DeepShadowDb _db = this;

//REQUIRED FOR Mock Data Generation
_db.Configuration.ProxyCreationEnabled = false;
//_db.Database.Connection.ConnectionString.Dump();
//////////////////

//This is the code copied from the supposed CustomerService.GetAllCustomers method
//Note that the service does some data manipulation by setting Codes from another table.

var customers = _db.Customers.ToList();
var codes = _db.Codes.First();
foreach (var customer in Customers)
{
    customer.Codes = codes.Name.Split(',').ToList();
}
//This generates the code
customers.GenerateEntitiesFromList(toConsole: true);

8. The result

List<DeepShadowDbContext.Customer> list = new List<DeepShadowDbContext.Customer>();

DeepShadowDbContext.Customer a1 = new DeepShadowDbContext.Customer();
a1.CustomerId = 1;
a1.Name = @"Nicolo Paganini";
a1.Codes = new List<String>();
a1.Codes.Add("A1");
a1.Codes.Add("A2");
a1.Codes.Add("A3");
a1.Orders = new List<DeepShadowDbContext.Order>();
list.Add(a1);
DeepShadowDbContext.Customer a2 = new DeepShadowDbContext.Customer();
a2.CustomerId = 2;
a2.Name = @"Jasha Heifetz";
a2.Codes = new List<String>();
a2.Codes.Add("A1");
a2.Codes.Add("A2");
a2.Codes.Add("A3");
a2.Orders = new List<DeepShadowDbContext.Order>();
list.Add(a2);
DeepShadowDbContext.Customer a3 = new DeepShadowDbContext.Customer();
a3.CustomerId = 3;
a3.Name = @"Erica Morini";
a3.Codes = new List<String>();
a3.Codes.Add("A1");
a3.Codes.Add("A2");
a3.Codes.Add("A3");
a3.Orders = new List<DeepShadowDbContext.Order>();
list.Add(a3);
DeepShadowDbContext.Customer a4 = new DeepShadowDbContext.Customer();
a4.CustomerId = 4;
a4.Name = @"Hilary Hahn";
a4.Codes = new List<String>();
a4.Codes.Add("A1");
a4.Codes.Add("A2");
a4.Codes.Add("A3");
a4.Orders = new List<DeepShadowDbContext.Order>();
list.Add(a4);

return list;

Announcing DeftConfig

DeftConfig

Web.config and app.config shouldn't be stored. They should be generated. DeftConfig helps with that.

NuGet Package

GitHub Repository

Briefly

The .Net configuration story has never been particularly good. It's improving significantly in .Net Core, but there's a lot of .Net Framework code that's built and going to be built.

The fundamental problems with .Net Framework config files are:

  1. They require a physical file. A configuration can't be created in memory.
  2. They don't work well with multiple environments, even using XML Transformations as intended.
  3. They don't lend themselves to managing sensitive settings such as passwords, especially in a Continuous Integration environment.

DeftConfig makes it easier to use the "base config" approach to managing configuration files using XML Transformations. It follows a convention for how it finds the transformation file.

  1. Look for a file in the format web(or app).base.[Configuration].config. Example: web.base.Release.config
  2. Check the user profile's %APPDATA%\DeftConfig\{Project GUID} folder
  3. Check the project folder
  4. If not found, use web/app.base.Sample.config

This approach allows for storing a production config, with sensitive settings, in a Windows Continuous Integration server's appropriate user profile rather than version control. The server folder can be restricted via permissions.

It also allows multiple developers to have their own, local Debug config; it also doesn't get stored in source control.

Finally, DeftConfig recommends maintaining a sample config that will help new developers understand what configurations need to be changed, and can provide a safe, default working experience.

The package is just two components:

  1. An MSBuild targets file that applies the transformation and outputs the .config file.
  2. A utility to help configure the project, including adding an .ignore file for either Git or TFVC.

Important
I don't guarantee DeftConfig will work in your environment. You need to take the right steps to protect your source code, including backups, version control, and testing.

Goals

DeftConfig achieves several goals. Web.config is used in the examples below, but DeftConfig applies equally to app.config.

  1. Don't store web.config or web.Debug/Release.config in source control.
  2. Don't store web.Debug.config in source control, allow independent developer configurations.
  3. Use web.base.config file for XmlTransform source, and apply web.base.[Configuration].config transform file.
  4. Make Windows-based Continuous Integration easier and more secure by searching for transform files in a user profile folder first, then in the project file.
  5. Make it easier for new developers to use non-destructive settings.

Cons

All isn't lemonade and corn dogs when using DeftConfig. There are a few challenges that you need to be aware of.

  1. NuGet packages often modify the web.config file (EntityFramework, for example). It will be critical for developers who add packages to copy any changes from the local web.config into web.base.config.
  2. If you change only one of the config files, then do a standard build (F6), web.config won't be updated. You'll need to do a Rebuild. (This is not an issue with TFS Build server, which always does a rebuild).

Installation

  1. Install the NuGet package. This adds the DeftConfig.targets file, and an executable named DeftConfigInitializer is copied to the project root folder.
  2. Run DeftConfigInitializer, which will
    1. Create a user profile folder for config files, if desired.
    2. Convert existing *.config files to use the *.base.config method.
    3. Add a .gitignore or .tfignore file so that the standard *.config files are ignored by default.
  3. Delete DeftConfigInitializer, if desired.

Typical project files before DeftConfig

and after running DeftConfigInitializer

The Debug and Release configs are still in the project folder, except they've been converted to "base" files.

Files

Any settings that were previously in web.config are now in web.base.config.

Here are the recommended way of using the files, with an example. The original web.config had these appSettings. Notice that the production and dev credentials are being stored. Developers have been commenting/uncommenting.

</appSettings>
    <add key="CustomizationVersion" value="HGC1234" />
    <!--
    <add key="WebServiceUser" value="dev-user"/>
    <add key="WebServicePassword" value="DevPass"/>
    -->
    <add key="WebServiceUser" value="production-admin"/>
    <add key="WebServicePassword" value="Pr0ductionPassw0rd!"/>
</appSettings>

web.base.config

The base config should retain values that are not transformed, and shouldn't have values for settings that will be tranformed. This is also a good place to document the settings. Copy those credential appSettings elsewhere, we'll need them later.

</appSettings>
    <!-- Don't change: It's specific to this client -->
    <add key="CustomizationVersion" value="HGC1234" />
    <!-- Credentials for the 3rd party web service -->
    <add key="WebServiceUser" value=""/>
    <add key="WebServicePassword" value="" />
</appSettings>

web.base.Sample.config

The Sample config file is stored in source control. It acts as a default configuration. If a Configuration (Debug/Release) config file can't be found, the Sample will be used. These could be default values for a developer, or dummy values.

</appSettings>
    <add key="WebServiceUser" value="user" xdt:Locater="Match(key)" xdt:Transform="Replace"/>
    <add key="WebServicePassword" value="pass" xdt:Locater="Match(key)" xdt:Transform="Replace"/>
</appSettings>

web.base.Debug.config

The Debug file is for developer settings. Since it's not stored in source control, each developer can have her own settings.

</appSettings>
    <add key="WebServiceUser" value="dev-user" xdt:Locater="Match(key)" xdt:Transform="Replace"/>
    <add key="WebServicePassword" value="DevPass" xdt:Locater="Match(key)" xdt:Transform="Replace"/>
</appSettings>

web.base.Release.config

Like the Debug file, the Release file is also not stored in source control. As shown below, if using a Windows-based continuous build system, it will be stored in the user profile of the automated build agent. This keeps sensitive credentials out of source control.

</appSettings>
    <add key="WebServiceUser" value="production-admin" xdt:Locater="Match(key)" xdt:Transform="Replace"/>
    <add key="WebServicePassword" value="Pr0ductionPassw0rd!" xdt:Locater="Match(key)" xdt:Transform="Replace"/>
</appSettings>

Building a Configuration

As noted above, the safest way to build is to right-click the Solution and choose Rebuild. But in most cases you'll be able to just F6 or F5.

Which configuration is used is determined by the selected Configuration.

Many development shops have a separate testing or staging environment. To configure that with DeftConfig, you'd simply add the configuration such as "Stage" using Configuration Manager, then manually create the web.base.Stage.config transform file (probably using copy/paste).

Where and How Transform Files are Searched

The initializer utility will optionally create a folder in the user's profile. The folder is named using the project's GUID, since the project name could change. The path is:

C:\Users\[user]\AppData\Roaming\DeftConfig\{PROJECT GUID}

Strictly speaking, the path is %AppData%\DeftConfig\{PROJECT GUID}

The DeftConfig build target checks for a matching config file in the following order. The diagram assumes the Release configuration is being built for MyAppProject.

Why Isn't Web.config Removed From the Project?

Only files that are part of the project (that is, they're in the .csproj or .vsproj file) will be copied when using the project's Publish feature.

  <ItemGroup>
    <Content Include="DeftConfigInitializer.exe" />
    <Content Include="Web.config" />
    <None Include="Web.base.config" />
    <None Include="Web.base.Sample.config" />
  </ItemGroup>

However, just because there's an entry in the project file for web.config doesn't mean it has to be in the folder when you get the code from source control. It just has to be there when Publish is run.

This is why I recommend adding web.config to a Git or TFS ignore file in the project folder. Web.config will always be created as part of the build process, so it doesn't need to be stored in source control.

DeftConfigInitializer will do this automatically if you choose.

Using Git

# Visual Studio 2015 Note: a pattern in the first line is ignored by Changes. Visual Studio Bug.
# DeftConfig - Ignore/allow certain config files when using *.base.[Build].config transform method

/[Ww]eb.config
/[Ww]eb.*.config
!/[Ww]eb.[Bb]ase.config
!/[Ww]eb.[Bb]ase.[Ss]ample.config

/[Aa]pp.config
/[Aa]pp.*.config
!/[Aa]pp.[Bb]ase.config
!/[Aa]pp.[Bb]ase.[Ss]ample.config

Using TFVS

#TFVS Ignore

\Web.config
\Web.*.config
!\Web.base.config
!\Web.base.Sample.config

\App.config
\App.*.config
!\App.base.config
!\App.base.Sample.config

TFS 2015: Publish ASP.NET Using Robocopy


Team Foundation Server 2015 Update 2 includes Release Management. However, I found myself in a position where a client hadn't upgraded yet, and during development I still wanted to publish ASP.NET MVC and WebApi projects to a test server. I did this through a combination of Build tasks running the msbuild publish command line, and Robocopy.

Also, while TFS Build includes steps for staging artifacts, an ASP.NET project doesn't simply move all files to a bin folder. Many files are taken directly from the project source folders, requiring me to use the MSBuild Publish command line switches.

The TFS Build Definition

In my Build, I'm going to do the following steps:

  1. Get the source code
  2. Get the NuGet packages
  3. Build and Test <= if anything fails up to this point, I don't want to publish
  4. Use msbuild to publish locally (to the Build agent workspace)
  5. Use Robocopy to copy the files to another computer running IIS

The first three steps are pretty standard, so I won't cover them. If you don't know how to set up a build, you'll need to read up on that. The last two are the fun ones.

Publishing ASP.NET from command line

In Visual Studio, it's easy (and nice) to publish an ASP.NET project to the file system. But what if you want to publish in an ad-hoc manner? It can be done, but the info is hard-won.

msbuild ProjectFile.csproj /p:Configuration=Release ^
                           /p:Platform=AnyCPU ^
                           /t:WebPublish ^
                           /p:WebPublishMethod=FileSystem ^
                           /p:DeleteExistingFiles=True ^
                           /p:publishUrl=c:\output
                           
Or if you are building the solution file:

msbuild Solution.sln /p:Configuration=Release ^ 
                     /p:DeployOnBuild=True ^
                     /p:DeployDefaultTarget=WebPublish ^
                     /p:WebPublishMethod=FileSystem ^
                     /p:DeleteExistingFiles=True ^
                     /p:publishUrl=c:\output

In my Build definition, I add a Visual Studio Build step. (I could probably also use an MS Build step, but I haven't tested that.)

In the Solution field, enter the path to the web project you're going to build. The MSBuild Arguments are shown below. Note the variables used for both the build configuration and the destination folder. I'm publishing locally first.

/p:Configuration=$(BuildConfiguration) /p:DeployOnBuild=True /p:DeployDefaultTarget=WebPublish /p:WebPublishMethod=FileSystem /p:publishUrl="$(build.artifactstagingdirectory)\deploy\web"

Note
If I was also publishing a WebApi project in the same definition, I'd have a separate build step, and the publishUrl might be $(build.artifactstagingdirectory)\deploy\api

Copy the site to its destination using Robocopy

Why am I not using the publishUrl, above, to publish to the destination server? In many cases, I could, and that's fine. But what if I expect a destination file to be in use, and isn't normally updated? For example, I had a site using the NHunspell.dll. That file would often be in use, and wasn't changing. If I used publishUrl, the publish would always fail.

Microsoft's Robocopy ("Robust Copy"), included in all Windows editions, will skip and retry files it can't copy. This will still show as an error, but I'll set the step to "continue on error". It's not a perfect solution, but fine for many environments.

Add a Command Line step to the definition.

  • Tool = robocopy.exe
  • Arguments = "$(build.artifactstagingdirectory)\deploy\web" "\\iis-server\wwwroot$\my-web-site" /e /r:2 /w:5

The Robocopy arguments say:

  1. Copy from the local deploy\web folder to the remote server folder
  2. /e = Copies subdirectories. Note that this option includes empty directories.
  3. /r:2 = Retry busy files twice.
  4. /w:5 = Wait five seconds between retry attempts.

When the step runs, Robocopy outputs a nice report of what happened, very useful when viewing the build log.

Wrap Up

While not ideal, the above is a useful workaround for publishing ASP.NET build artifacts to a remote machine. It also shows the flexibility that can be obtained through using other tools.

References

How to use MsBuild MsDeployPublish to target local file system?

An ASP.NET MVC Site That’s Easy to Deploy from a TFS Build

Robocopy