A pleasant walk through computing

Comment for me? Send an email. I might even update the post!

.NET MAUI Progressing From a Default Project Part 5 - Restyling From Scratch

The Series

Level: Moderate

This series assumes the developer is familiar with .NET MAUI, the Model-View-ViewModel pattern, and has worked through one or more tutorials such as the excellent James Montemagno's Workshop.

Source: https://github.com/bladewolf55/net-maui-progression

What Problem Do Styles Solve?

Fundamentally, styles let you declare in one place how something will look no matter where it appears. A style differs (in my mind) from a format.

Let's consider a button. Here's one with a default format.

It's grey, square, and uses the host's default sans serif typeface positioned top left. Now let's format the button.

Yes, you're right, some people will say "style" the button. That's OK, I'm drawing a distinction to clarify what styles are. If you prefer, you can think of them later as "named styles." I'll be using the word more casually later on.

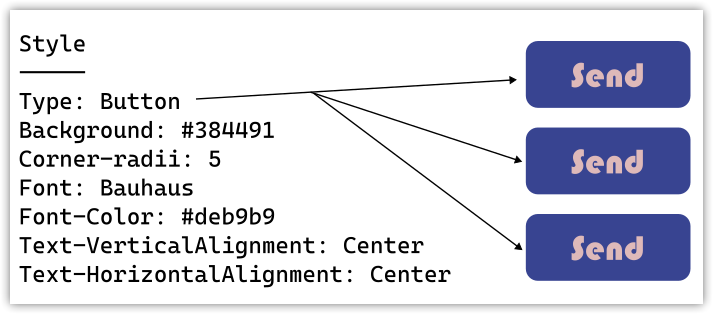
Now the button background is blue with rounded corners, the text color is peach with a Bauhaus typeface and centered.

In a larger application, I want to apply the same format to each button automatically instead of manually on each one. That way, if I want to change the background to green I can do it in one place. I do that by creating a style.

This is an application of the Don't Repeat Yourself (DRY) principle.

Styles seem simple, but they get tricky pretty quickly when you want to do things like change a button's style depending on whether it's a Save or Delete (maybe the delete button should be bright red, but otherwise the same as other buttons).

Taken together, styles are part of the application's UI/UX design.

Starting Our Styles Over

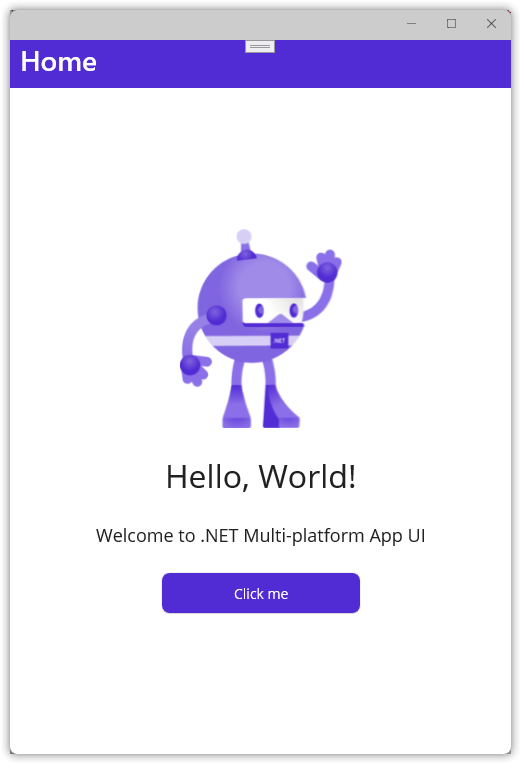
Here's what our app looks like right now.

Let's get rid of all our styles. We'll create new ones later.

  1. In the Maui.Progression project Resources/Styles folder, delete these two files:

    • Colors.xslt
    • Styles.xslt
  2. In Resources/Fonts, delete both OpenSans .ttf files.

  3. Open App.xaml and delete the Application.Resources node, leaving you with this.

    <?xml version = "1.0" encoding = "UTF-8" ?>
    <Application xmlns="http://schemas.microsoft.com/dotnet/2021/maui"
                xmlns:x="http://schemas.microsoft.com/winfx/2009/xaml"
                xmlns:local="clr-namespace:Maui.Progression"
                x:Class="Maui.Progression.App">
    </Application>
    
  4. Open MauiProgram.cs and delete these lines.

    .ConfigureFonts(fonts =>
    {
        fonts.AddFont("OpenSans-Regular.ttf", "OpenSansRegular");
        fonts.AddFont("OpenSans-Semibold.ttf", "OpenSansSemibold");
    });
    

    leaving this

    public static MauiApp CreateMauiApp()
    {
    	var builder = MauiApp.CreateBuilder();
    	builder
    		.UseMauiApp<App>();
    
    	builder.Services.AddSingleton<INumberMapper>(new NumberMapper());
    	builder.Services.AddSingleton<Counter>();
    	builder.Services.AddSingleton<MainPage>();
    
        return builder.Build();
    }
    
  5. Edit Maui.Progression.csproj and comment out the MauiFont Include line.

		<!-- Custom Fonts -->
		<!--<MauiFont Include="Resources\Fonts\*" />-->
  1. Open MainPage.xaml and replace with this code. It removes all inline styling.

    SemanticProperties can be included in styles, but I'm not doing it in this post.

    <?xml version="1.0" encoding="utf-8" ?>
    <ContentPage xmlns="http://schemas.microsoft.com/dotnet/2021/maui"
                xmlns:x="http://schemas.microsoft.com/winfx/2009/xaml"
                x:Class="Maui.Progression.Views.MainPage"
                xmlns:viewmodels="clr-namespace:Maui.Progression.ViewModels;assembly=Maui.Progression.ViewModels"
                x:DataType="viewmodels:Counter"
                >
        <ScrollView>
            <VerticalStackLayout >
                <Image
                    Source="dotnet_bot.png"
                    SemanticProperties.Description="Cute dot net bot waving hi to you!" />
                <Label 
                    Text="Hello, World!"
                    SemanticProperties.HeadingLevel="Level1" />
                <Label 
                    Text="Welcome to .NET Multi-platform App UI"
                    SemanticProperties.HeadingLevel="Level2"
                    SemanticProperties.Description="Welcome to dot net Multi platform App U I" />
                <Button
                    Text="{Binding CountText}"
                    SemanticProperties.Hint="Counts the number of times you click"
                    Command="{Binding IncreaseCounterCommand}" />
            </VerticalStackLayout>
        </ScrollView>
    </ContentPage>
    

Weirdness
I found the app still runs even if the font files are deleted and the .ConfigureFonts method is still in place. Maybe that's intentional, but I'd have expected a compile error.

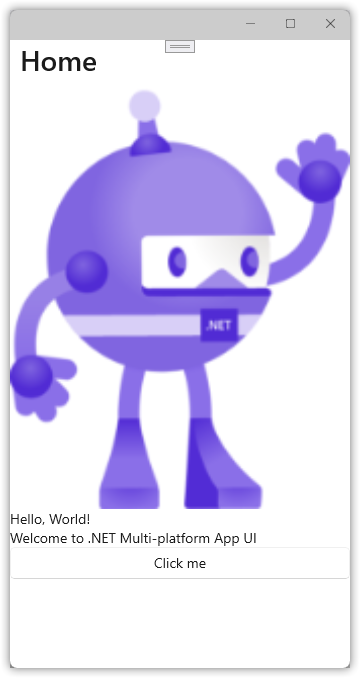
Run the app. It looks pretty horrific, but still works.

What Are Our Elements?

We're going to style our app, but what can we style? Just like on the web, a page is made up of elements in a layout.

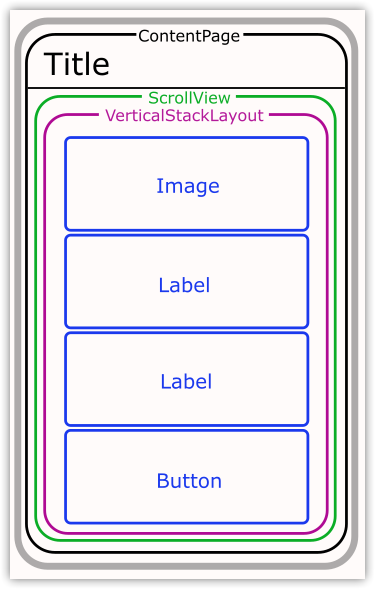
All of these elements can be styled. That is, they all have a Style property that can be set to a named style. Setting the element's properties overrides the style.

We can think of our layout as a set of containers. Styles are inherited, meaning inner elements (usually) get the same formatting as the outer elements unless overridden.

We're going to progressively style our app's elements, and then add a button with some overrides.

The Hard Way

But first, let's format each element separately, starting with the content page. Add a BackgroundColor to MainPage.xaml.

<ContentPage xmlns="http://schemas.microsoft.com/dotnet/2021/maui"
             xmlns:x="http://schemas.microsoft.com/winfx/2009/xaml"
             x:Class="Maui.Progression.Views.MainPage"
             xmlns:viewmodels="clr-namespace:Maui.Progression.ViewModels;assembly=Maui.Progression.ViewModels"
             x:DataType="viewmodels:Counter"
             BackgroundColor="AliceBlue"
             >

As expected, this changes the background to a pale blue.

Note a couple of things.

  1. The button background is white. That's because it's not transparent like the labels.
  2. The title background is still white. Why is that?

Our app is using the Shell App method for laying out the overall content, which includes the title element.

Think of App Shell as the overall container for your app that all pages inherit from.

Open AppShell.xaml and format the Shell.BackgroundColor and Shell.TitleColor.

<?xml version="1.0" encoding="UTF-8" ?>
<Shell
    x:Class="Maui.Progression.AppShell"
    xmlns="http://schemas.microsoft.com/dotnet/2021/maui"
    xmlns:x="http://schemas.microsoft.com/winfx/2009/xaml"
    xmlns:local="clr-namespace:Maui.Progression.Views"
    Shell.FlyoutBehavior="Disabled" 
    Shell.BackgroundColor="MediumPurple"
    Shell.TitleColor="GhostWhite"
    >
    <ShellContent
        Title="Home"
        ContentTemplate="{DataTemplate local:MainPage}"
        Route="MainPage" />
</Shell>

Note this is also where the default page Title is set.

Also, these same properties can be set in a view's ContentPage element. So, each page could have a different title color. Whimsy.

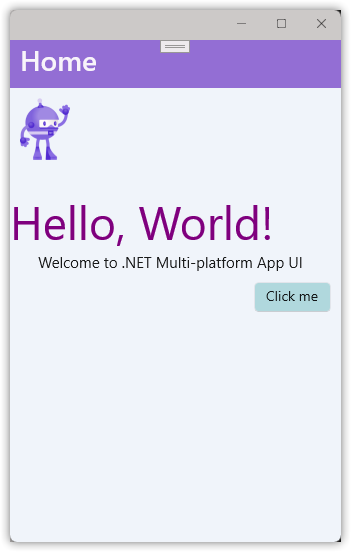
Here's the result. (No one ever said I'm good with colors.)

Back to MainPage.xaml and well finish our manual formatting.

<?xml version="1.0" encoding="utf-8" ?>
<ContentPage xmlns="http://schemas.microsoft.com/dotnet/2021/maui"
             xmlns:x="http://schemas.microsoft.com/winfx/2009/xaml"
             x:Class="Maui.Progression.Views.MainPage"
             xmlns:viewmodels="clr-namespace:Maui.Progression.ViewModels;assembly=Maui.Progression.ViewModels"
             x:DataType="viewmodels:Counter"
             BackgroundColor="AliceBlue"
             >
    <ScrollView>
        <VerticalStackLayout>
            <Image
                Source="dotnet_bot.png"
                SemanticProperties.Description="Cute dot net bot waving hi to you!" 
                WidthRequest="50"
                HorizontalOptions="Start"
                Margin="10,10,0,30"/>
            <Label 
                Text="Hello, World!"
                SemanticProperties.HeadingLevel="Level1" 
                FontSize="Header" 
                TextColor="Purple" 
                FontFamily="AbrilFatface"/>
            <Label 
                Text="Welcome to .NET Multi-platform App UI"
                SemanticProperties.HeadingLevel="Level2"
                SemanticProperties.Description="Welcome to dot net Multi platform App U I" 
                FontSize="15"
                HorizontalTextAlignment="Center"
                Margin="0,0,10,10" 
                FontFamily="AbrilFatface" />
            <Button
                Text="{Binding CountText}"
                SemanticProperties.Hint="Counts the number of times you click"
                Command="{Binding IncreaseCounterCommand}" 
                HorizontalOptions="End" 
                Margin="0,0,10,0"
                BackgroundColor="#b0dce1" 
                FontFamily="AbrilFatface"/>
        </VerticalStackLayout>
    </ScrollView>
</ContentPage>

Run the app to get this admittedly ugly user experience, but one that demonstrates some features.

Our changes are working except for the font. That's because we need to explicitly load that font resource.

  1. Download the Abril Fatface font from Google. (Or use some other font file of your choice.)
  2. Unpack and copy the files into the Resources\Fonts folder.
  3. In Maui.Progression.csproj, uncomment this line to include any font files in the Fonts folder in the app build.
    <MauiFont Include="Resources\Fonts\*" />
    
  4. In MauiProgram.cs add this code to register the font file and give it a friendly name.
    builder
        .UseMauiApp<App>()
        .ConfigureFonts(fonts =>
        {
            fonts.AddFont("AbrilFatface-Regular.ttf", "AbrilFatface");
        });
    

Restart the app to see the change.

Page-Level Styles (Ending With Inheritance)

We can format at the lowest level: individual elements. Let's create some styles at the page level.

In MainPage.xaml, add a ContentPage.Resources node with the following.

<ContentPage.Resources>
    <Style x:Key="page" TargetType="ContentPage">
        <Setter Property="BackgroundColor" Value="AliceBlue" />
    </Style>
</ContentPage.Resources>

Replace the ContentPage BackgroundColor="AliceBlue" property with a Style property.

<ContentPage xmlns="http://schemas.microsoft.com/dotnet/2021/maui"
             xmlns:x="http://schemas.microsoft.com/winfx/2009/xaml"
             x:Class="Maui.Progression.Views.MainPage"
             xmlns:viewmodels="clr-namespace:Maui.Progression.ViewModels;assembly=Maui.Progression.ViewModels"
             x:DataType="viewmodels:Counter"
==>          Style="{StaticResource page}"

Try running the app. Here we run into an irritating error.

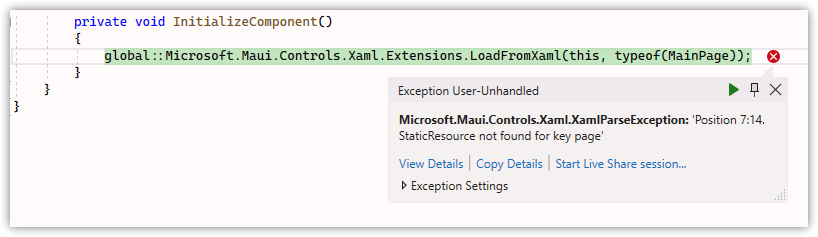
Maybe I'm missing something, but it appears we can't define a ContentPage style for the content page we're in. Harrumph!

Undo both changes above. We can create ContentPage styles, but we'll do it later when we move our styles to the application.

For now, add this ContentPage.Resources block instead.

    <ContentPage.Resources>
        <Style TargetType="Label">
            <Setter Property="FontFamily" Value="AbrilFatface"/>
        </Style>
        <Style TargetType="Button">
            <Setter Property="FontFamily" Value="AbrilFatface"/>
        </Style>
    </ContentPage.Resources>

In each label and the button, delete the FontFamily="AbrilFatface" attribute, then rerun the app, which should look the same as before. All we've done is create a couple of styles that say "If you display a label or a button, use the AbrilFatface font." You can prove it works by changing the FontFamily name to something else such as "Consolas" (on Windows).

These are implicit styles. They're applied to elements that match the TargetType exactly.

Note
But not to elements derived from the TargetType unless ApplyToDerivedTypes = True. See Microsoft's documentation (linked in Resources) for more details.

Let's convert these to explicit styles. We do that by setting the x:Key attribute.

<ContentPage.Resources>
    <Style x:Key="baseLabel" TargetType="Label">
        <Setter Property="FontFamily" Value="AbrilFatface"/>
    </Style>
    
    <Style x:Key="baseButton" TargetType="Button">
        <Setter Property="FontFamily" Value="AbrilFatface"/>
    </Style>
</ContentPage.Resources>

Since we've given our styles keys, we need to explicitly use them by using the Style attribute.

<Label 
    Text="Hello, World!"
    SemanticProperties.HeadingLevel="Level1" 
    FontSize="Header" 
    TextColor="Purple" 
    Style="{StaticResource baseLabel}"
    />
<Label 
    Text="Welcome to .NET Multi-platform App UI"
    SemanticProperties.HeadingLevel="Level2"
    SemanticProperties.Description="Welcome to dot net Multi platform App U I" 
    FontSize="15"
    HorizontalTextAlignment="Center"
    Margin="0,0,10,10" 
    Style="{StaticResource baseLabel}"
        />
<Button
    Text="{Binding CountText}"
    SemanticProperties.Hint="Counts the number of times you click"
    Command="{Binding IncreaseCounterCommand}" 
    HorizontalOptions="End" 
    Margin="0,0,10,0"
    BackgroundColor="#b0dce1" 
    Style="{StaticResource baseButton}"
    />

Now let's build on this by defining two label styles that inherit from baseLabel.

Important
Per Microsoft, "An implicit style can be derived from an explicit style, but an explicit style can't be derived from an implicit style."

<Style x:Key="baseLabel" TargetType="Label">
    <Setter Property="FontFamily" Value="AbrilFatface"/>
</Style>
<Style x:Key="header" TargetType="Label" BasedOn="{StaticResource baseLabel}">
    <Setter Property="FontSize" Value="Header"/>
    <Setter Property="TextColor" Value="Purple"/>
</Style>
<Style x:Key="greeting" TargetType="Label" BasedOn="{StaticResource baseLabel}">
    <Setter Property="FontSize" Value="15"/>
    <Setter Property="HorizontalTextAlignment" Value="Center"/>
    <Setter Property="Margin" Value="0,0,10,10"/>
</Style>

The formatting can be removed from the labels.

<Label 
    Text="Hello, World!"
    SemanticProperties.HeadingLevel="Level1" 
    Style="{StaticResource header}"
    />
<Label 
    Text="Welcome to .NET Multi-platform App UI"
    SemanticProperties.HeadingLevel="Level2"
    SemanticProperties.Description="Welcome to dot net Multi platform App U I" 
    Style="{StaticResource greeting}"
        />

Let's assume our baseButton is going to use all the formatting, not just the font.

<Style x:Key="baseButton" TargetType="Button">
    <Setter Property="FontFamily" Value="AbrilFatface"/>
    <Setter Property="HorizontalOptions" Value="End"/>
    <Setter Property="Margin" Value="0,0,10,0"/>
    <Setter Property="BackgroundColor" Value="#b0dce1"/>
</Style>

Which lets us simplify the button element.

<Button
    Text="{Binding CountText}"
    SemanticProperties.Hint="Counts the number of times you click"
    Command="{Binding IncreaseCounterCommand}" 
    Style="{StaticResource baseButton}"
    />

And do the same thing with the image. Why? I've found it's generally a good practice to keep all your styling together, even what seems like one-offs.

Concept
What this helps with is separation of concerns. We're separating out the styling (how elements look) from the semantics (what elements mean), letting us encapsulate our code and improve maintainability.

<Style x:Key="pageImage" TargetType="Image">
    <Setter Property="Source" Value="dotnet_bot.png"/>
    <Setter Property="WidthRequest" Value="50"/>
    <Setter Property="HorizontalOptions" Value="Start"/>
    <Setter Property="Margin" Value="10,10,0,30"/>
</Style>
<Image
    Source="dotnet_bot.png"
    SemanticProperties.Description="Cute dot net bot waving hi to you!" 
    Style="{StaticResource pageImage}"/>

Inheritance is nice and all, and tempting, but let's redo our styles to use what's often more powerful: composition through classes.

Styling With Class(es)

One issue we ran into above is, in order to define named styles for our labels, we needed to inherit from a named base style.

Comparison
That's not the way it works in Cascading Style Sheets (CSS), where you can define styles for all label tags, then named styles that override those styles (using either an id or class identifier).

When we use inheritance, we're stuck with whatever styles we defined in the base style. We can override those styles, but not remove them.

If we use classes, we can define characteristics or behaviors that we're styling for, define small, discreet sets of styles, and combine them. For example, maybe all labels have a blue background ("normal"), some get a bold font ("strong"), others get a large font size ("big"). Using classes, we could style a label as "normal strong", "normal big", or "normal strong big".

In our case, we're going to replace our inherited label styles with class-based styles, just to prove it works.

Remove/replace the x:Key attributes as shown.

<Style TargetType="Label">
    <Setter Property="FontFamily" Value="AbrilFatface"/>
</Style>
<Style Class="header" TargetType="Label" >
    <Setter Property="FontSize" Value="Header"/>
    <Setter Property="TextColor" Value="Purple"/>
</Style>
<Style Class="greeting" TargetType="Label">
    <Setter Property="FontSize" Value="15"/>
    <Setter Property="HorizontalTextAlignment" Value="Center"/>
    <Setter Property="Margin" Value="0,0,10,10"/>
</Style>

Update the label elements to use the StyleClass attribute.

<Label 
    Text="Hello, World!"
    SemanticProperties.HeadingLevel="Level1" 
    StyleClass="header"
    />
<Label 
    Text="Welcome to .NET Multi-platform App UI"
    SemanticProperties.HeadingLevel="Level2"
    SemanticProperties.Description="Welcome to dot net Multi platform App U I" 
    StyleClass="greeting"
    />

Restart the app and it should look the same as before.

Important
There's a downside to using classes. You can't interactively change style values while the app is running, because the changes aren't supported by Hot Reload. This is unfortunate, because using classes is really valuable and the friction might make developers shy away from them.

Movin' On Up! Using Global Styles

The next level up for styles is the Application. Here you define styles used throughout your pages. It's where you should expect most of your styles to live.

Cut the entire ContentPage.Resources node from MainPage.xaml and paste it into App.xaml inside the Application node. Then rename it to "Application.Resources".

<?xml version = "1.0" encoding = "UTF-8" ?>
<Application xmlns="http://schemas.microsoft.com/dotnet/2021/maui"
             xmlns:x="http://schemas.microsoft.com/winfx/2009/xaml"
             xmlns:local="clr-namespace:Maui.Progression"
             x:Class="Maui.Progression.App">
    <Application.Resources>
        <Style x:Key="pageImage" TargetType="Image">
            <Setter Property="Source" Value="dotnet_bot.png"/>
            <Setter Property="WidthRequest" Value="50"/>
            <Setter Property="HorizontalOptions" Value="Start"/>
            <Setter Property="Margin" Value="10,10,0,30"/>
        </Style>
        <Style TargetType="Label">
            <Setter Property="FontFamily" Value="AbrilFatface"/>
        </Style>
        <Style Class="header" TargetType="Label" >
            <Setter Property="FontSize" Value="Header"/>
            <Setter Property="TextColor" Value="Purple"/>
        </Style>
        <Style Class="greeting" TargetType="Label">
            <Setter Property="FontSize" Value="15"/>
            <Setter Property="HorizontalTextAlignment" Value="Center"/>
            <Setter Property="Margin" Value="0,0,10,10"/>
        </Style>
        <Style x:Key="baseButton" TargetType="Button">
            <Setter Property="FontFamily" Value="AbrilFatface"/>
            <Setter Property="HorizontalOptions" Value="End"/>
            <Setter Property="Margin" Value="0,0,10,0"/>
            <Setter Property="BackgroundColor" Value="#b0dce1"/>
        </Style>
    </Application.Resources>
</Application>

That's . . . it. The app runs the same as before.

Let's deal with something from earlier, though. Remember our content page background color? We can create a style for content pages here. Add the following.

<Style TargetType="ContentPage">
    <Setter Property="BackgroundColor" Value="AliceBlue"/>
</Style>

Back in MainPage.xaml, delete the ContentPage BackgroundColor attribute.

<ContentPage xmlns="http://schemas.microsoft.com/dotnet/2021/maui"
             xmlns:x="http://schemas.microsoft.com/winfx/2009/xaml"
             x:Class="Maui.Progression.Views.MainPage"
             xmlns:viewmodels="clr-namespace:Maui.Progression.ViewModels;assembly=Maui.Progression.ViewModels"
             x:DataType="viewmodels:Counter"
-> DELETE    BackgroundColor="AliceBlue"
             >

Rerun the app and you should still see a blue background.

But you don't! Why not? Because our pages are derived from ContentPage, which isn't obvious. The solution?

<Style TargetType="ContentPage" ApplyToDerivedTypes="True">
    <Setter Property="BackgroundColor" Value="AliceBlue" />
</Style>

Now the background shows as expected.

Take Your Styles Outside, Young Man

If you've worked with web sites, you know that separate style files is a big deal. And, as noted above, it's a good practice. So let's come full circle and pull our styles out into their own file.

  1. Add a file named Styles.xaml to the Resources/Styles folder.
  2. Cut the Application.Resources node from App.xaml and paste it into Styles.xaml.
  3. Rename Application.Resources to ResourceDictionary
  4. Replace the top of the file like so.
    <?xml version="1.0" encoding="UTF-8" ?>
    <?xaml-comp compile="true" ?>
    <ResourceDictionary 
        xmlns="http://schemas.microsoft.com/dotnet/2021/maui"
        xmlns:x="http://schemas.microsoft.com/winfx/2009/xaml">
    

Here's the complete file.

<?xml version="1.0" encoding="UTF-8" ?>
<?xaml-comp compile="true" ?>
<ResourceDictionary 
    xmlns="http://schemas.microsoft.com/dotnet/2021/maui"
    xmlns:x="http://schemas.microsoft.com/winfx/2009/xaml">
    <Style TargetType="ContentPage" ApplyToDerivedTypes="True">
        <Setter Property="BackgroundColor" Value="AliceBlue"/>
    </Style>
    <Style x:Key="pageImage" TargetType="Image">
        <Setter Property="Source" Value="dotnet_bot.png"/>
        <Setter Property="WidthRequest" Value="50"/>
        <Setter Property="HorizontalOptions" Value="Start"/>
        <Setter Property="Margin" Value="10,10,0,30"/>
    </Style>
    <Style TargetType="Label">
        <Setter Property="FontFamily" Value="AbrilFatface"/>
    </Style>
    <Style Class="header" TargetType="Label" >
        <Setter Property="FontSize" Value="Header"/>
        <Setter Property="TextColor" Value="Purple"/>
    </Style>
    <Style Class="greeting" TargetType="Label">
        <Setter Property="FontSize" Value="15"/>
        <Setter Property="HorizontalTextAlignment" Value="Center"/>
        <Setter Property="Margin" Value="0,0,10,10"/>
    </Style>
    <Style x:Key="baseButton" TargetType="Button">
        <Setter Property="FontFamily" Value="AbrilFatface"/>
        <Setter Property="HorizontalOptions" Value="End"/>
        <Setter Property="Margin" Value="0,0,10,0"/>
        <Setter Property="BackgroundColor" Value="#b0dce1"/>
    </Style>
</ResourceDictionary>

Back in App.xaml, we're going to merge our styles file. If we had more than one file (likely), we'd merge them all this way.

<?xml version = "1.0" encoding = "UTF-8" ?>
<Application xmlns="http://schemas.microsoft.com/dotnet/2021/maui"
             xmlns:x="http://schemas.microsoft.com/winfx/2009/xaml"
             xmlns:local="clr-namespace:Maui.Progression"
             x:Class="Maui.Progression.App">
    <Application.Resources>
        <ResourceDictionary>
            <ResourceDictionary.MergedDictionaries>
                <ResourceDictionary Source="Resources/Styles/Styles.xaml"/>
            </ResourceDictionary.MergedDictionaries>
        </ResourceDictionary>
    </Application.Resources>
</Application>

Rerun the app and, as before, it has our styles.

Wrap Up

We covered a lot, but XAML styles are a much deeper subject and I won't say I've explored its fathoms. Be sure to check out the links below.

Next up: Build (and maybe deployment)!

Resources

.NET MAUI Progressing From a Default Project Part 4 - Putting the View in Its Place

The Series

Level: Moderate

This series assumes the developer is familiar with .NET MAUI, the Model-View-ViewModel pattern, and has worked through one or more tutorials such as the excellent James Montemagno's Workshop.

Source: https://github.com/bladewolf55/net-maui-progression

Moving the View

Compared to the last part, this one's really short.

Our app has one view, MainPage, sitting in the root of the project. Like the rest of this series, that's fine for a small app with just a few views. But let's keep our app tidy and pretend it's going to have a dozen views.

Which might be an awful lot for a mobile app.

In the Maui.Progression project, add a folder named "Views" and move the MainPage files (MainPage.xaml and MainPage.xaml.cs) into it. When prompted to adjust namespaces, choose Yes.

Trickery, trickery, trickery1 Neither of our files' namespaces got updated.

Open MainPage.xaml.cs and update the namespace.

using Maui.Progression.ViewModels;

namespace Maui.Progression.Views;

Open MainPage.xaml and update the page's x:Class namespace.

<?xml version="1.0" encoding="utf-8" ?>
<ContentPage xmlns="http://schemas.microsoft.com/dotnet/2021/maui"
             xmlns:x="http://schemas.microsoft.com/winfx/2009/xaml"
             x:Class="Maui.Progression.Views.MainPage"

We also need to edit MauiProgram.cs to add Maui.Progression.Views.

using Maui.Progression.DomainServices;
using Maui.Progression.DomainServices.Interfaces;
using Maui.Progression.ViewModels;
using Maui.Progression.Views;

And the AppShell.xaml "local" namespace.

<?xml version="1.0" encoding="UTF-8" ?>
<Shell
    x:Class="Maui.Progression.AppShell"
    xmlns="http://schemas.microsoft.com/dotnet/2021/maui"
    xmlns:x="http://schemas.microsoft.com/winfx/2009/xaml"
    xmlns:local="clr-namespace:Maui.Progression.Views"

Run the program and the tests. Et voila! it works.

Wrap Up

I know, I know. "Jeez, that was easy, what was the point?"

The point is that we now have a well-organized application, which increases maintainability. We're following a View-Model-ViewModel pattern, and our Views, View Models, and Models are corralled into their metaphorical pens. We also saw just how pervasive and important the namespaces are, and that--unlike some other refactoring--Visual Studio doesn't (today) catch everything.

Next Up: Styles!


  1. From The Far Side by Gary Larson

.NET MAUI Progressing From a Default Project Part 3 - Adding the Model, More Testing, and DDD

The Series

Level: Moderate

This series assumes the developer is familiar with .NET MAUI, the Model-View-ViewModel pattern, and has worked through one or more tutorials such as the excellent James Montemagno's Workshop.

Source: https://github.com/bladewolf55/net-maui-progression

The Role of the Model in MVVM

Ugaya40, CC BY-SA 3.0 https://creativecommons.org/licenses/by-sa/3.0, via Wikimedia Commons

The purpose of the Model in MVVM is the same as in MVC. It's a class that either models a part of the domain (the way the business sees itself) or the data. In enterprise applications practicing Domain-Driven Design, a service usually populates the Domain Model from Data Models (abstractions of the various data sources).

Here's a more accurate diagram of a complex system.

We probably won't go deep into the data portion1, but getting the Model from a service is pretty common. Along the way, we'll write unit tests.

The Feature

We'll implement a simple feature: display the word for the number of button taps up to ten. To do that, we'll get a map of numbers to words from our service.

The Architecture

Here's the namespace/folder layout we'll end up with. I'm following a general DDD/Onion Architecture.

Solution
|_Maui.Progression
|_Maui.Progression.Domain
  |_Models
    |-NumberMap.cs
    |-NumberMapItem.cs
|_Maui.Progression.DomainServices
  |_Interfaces
    |-INumberMapper.cs
  |_NumberMapper.cs
|_Maui.Progression.UnitTests
  |-Counter_Should.cs
  |-NumberMap_Should.cs
  |-NumberMapperService_Should.cs
|_Maui.Progression.ViewModels

The Domain Models

  1. Add two new .NET Class Library projects, one named Maui.Progression.Domain, the other named Maui.Progression.DomainServices.

    These are plain class libraries, not specific to .NET MAUI.

  2. Add a Models folder.
  3. Delete Class1.cs, add NumberMapItem.cs to Models with this code.
    namespace Maui.Progression.Domain.Models;
    
    public class NumberMapItem
    {
        public int Number { get; set; }
        public string Word { get; set; } = string.Empty;
    
    }    
    

Next, we'll create a domain model for the collection of number map items, so let's create a test. In Maui.Progression.UnitTests,

  1. Add a project dependency to Maui.Progression.Domain.
  2. Add a class named NumberMap_Should.cs with this code.
using Maui.Progression.Domain;

namespace Maui.Progression.UnitTests;

public class NumberMap_Should
{
    [Fact]
    public void Return_words_for_numbers()
    {
        // arrange
        var map = new NumberMap();

        // act
        map.Map = new List<NumberMapItem>()
        {
            new NumberMapItem() { Number = 0, Word = "zero"},
            new NumberMapItem() { Number = 1, Word = "one"},
            new NumberMapItem() { Number = 2, Word = "two"},
            new NumberMapItem() { Number = 3, Word = "three"},
            new NumberMapItem() { Number = 4, Word = "four"},
            new NumberMapItem() { Number = 5, Word = "five"},
            new NumberMapItem() { Number = 6, Word = "six"},
            new NumberMapItem() { Number = 7, Word = "seven"},
            new NumberMapItem() { Number = 8, Word = "eight"},
            new NumberMapItem() { Number = 9, Word = "nine"},
            new NumberMapItem() { Number = 10, Word ="ten"}
        };

        // assert
        Assert.Equal("zero", map.ToWord(0));
        Assert.Equal("one",  map.ToWord(1));
        Assert.Equal("two",  map.ToWord(2));
        Assert.Equal("three",map.ToWord(3));
        Assert.Equal("four", map.ToWord(4));
        Assert.Equal("five", map.ToWord(5));
        Assert.Equal("six",  map.ToWord(6));
        Assert.Equal("seven",map.ToWord(7));
        Assert.Equal("eight",map.ToWord(8));
        Assert.Equal("nine", map.ToWord(9));
        Assert.Equal("ten",  map.ToWord(10));
    }

    [Fact]
    public void Return_null_if_number_not_found()
    {
        // arrange
        var map = new NumberMap();

        // act
        // assert
        Assert.Empty(map.Map);
        Assert.Null(map.ToWord(0));

    }
}

It's contrived, I know, but we have two tests, one to make sure we return words for numbers, the other for what happens if a number doesn't have a word.

Now add the class NumberMap.cs to the Models folder with this code to pass the tests.

using System;
using System.Collections.Generic;
using System.Linq;
using System.Text;
using System.Threading.Tasks;

namespace Maui.Progression.Domain.Models
{
    public class NumberMap
    {
        public List<NumberMapItem> Map { get; set; } = new();

        public string? ToWord(int number) => Map.SingleOrDefault(a => a.Number.Equals(number))?.Word;

    }
}

The Domain Service

Our domain service will return the domain model. Again, this is all overkill in reality, but it demonstrates the techniques.

  1. In the unit tests project, add a project reference to the DomainServices project.
  2. Add a unit test class named NumberMapperService_Should.cs with this code.
using Maui.Progression.DomainServices;

namespace Maui.Progression.UnitTests;

public class NumberMapperService_Should
{
    readonly NumberMapper numberMapper;

    // This would normally be an injectable data service
    // such as Entity Framework. We'd use an in-memory database
    // to mock our data access.
    readonly string numberData = @"[
{""number"":1, ""word"":""one""},
{""number"":3, ""word"":""three""},
{""number"":5, ""word"":""five""}
]";

    public NumberMapperService_Should()
    {        
        numberMapper = new NumberMapper(numberData);
    }

    [Fact]
    public void Return_a_populated_NumberMap()
    {
        // arrange
        // act
        var result = numberMapper.GetNumberMap();

        // assert
        Assert.NotEmpty(result.Map);
        Assert.Equal(3, result.Map.Count);
        Assert.Equal("one", result.ToWord(1));
        Assert.Equal("three", result.ToWord(3));
        Assert.Equal("five", result.ToWord(5));
    }
}

The above code declares the service and injects our own test data instead of letting it get data from an external source.

Add an Interfaces folder and an interface to DomainServices named INumberMapper.cs with this code.

using Maui.Progression.Domain.Models;

namespace Maui.Progression.DomainServices.Interfaces;

public interface INumberMapper
{
    NumberMap GetNumberMap();
}

We'll use this interface later to test our ViewModel.

The principles here are A) program to the interface, and B) dependency injection. By injecting an interface, we can mock the behavior later.

Add a class named NumberMapper.cs to DomainServices.

using Maui.Progression.Domain.Models;
using Maui.Progression.DomainServices.Interfaces;
using System.Text.Json;

namespace Maui.Progression.DomainServices
{
    public class NumberMapper : INumberMapper
    {
        string numberData = @"[
{""number"":1, ""word"":""one""},
{""number"":2, ""word"":""two""},
{""number"":3, ""word"":""three""},
{""number"":4, ""word"":""four""},
{""number"":5, ""word"":""five""},
{""number"":6, ""word"":""six""},
{""number"":7, ""word"":""seven""},
{""number"":8, ""word"":""eight""},
{""number"":9, ""word"":""nine""},
{""number"":10, ""word"":""ten""}
]";

        public NumberMapper(string numberData = "")
        {
            // Normally numberData would be an injectable data service
            // like Entity Framework.
            // Here we're letting the unit test inject test data. If empty,
            // assume the data service returned values 1-10.
            if (!String.IsNullOrEmpty(numberData))
                this.numberData = numberData;
        }
        public NumberMap GetNumberMap()
        {
            // Get our data and map it to our domain model list of map items.
            var options = new System.Text.Json.JsonSerializerOptions();
            options.PropertyNameCaseInsensitive = true;
            var items = JsonSerializer.Deserialize<List<NumberMapItem>>(numberData, options);
            // Populate the NumberMap domain model
            var map = new NumberMap() { Map = items ?? new List<NumberMapItem>() };
            // Return the domain model
            return map; ;
        }
    }
}

The class looks busy, but that's because of simulating getting JSON data from a database or external service. The method under test, GetNumberMap, is really pretty simple and follows a common pattern.

  1. Get external data.
  2. Map the data to our domain model.
  3. Return the model.

The test should pass! Note that we're injecting our test data, which is why we can assert that there are three items. When we use call the service from our ViewModel, it'll default to returning ten items.

Updating the ViewModel to Use the Service

Let's update our ViewModel Counter_Should tests to use the service. To do this, we need to mock the service, and let's start making our assertions easier to construct and read. In the Unit Tests project install two NuGet packages.

  • NSubstitute
  • FluentAssertions

Of course, you can use your preferred mocking library such as Moq, and your preferred assertion library such as Shouldly.

We need to do some prep before our test so that our solution builds with our dependency injection.

In ViewModels, open the Counter view model and update these top several lines. This will not pass the test!

using Maui.Progression.DomainServices;
using Maui.Progression.DomainServices.Interfaces;
using Microsoft.Toolkit.Mvvm.ComponentModel;
using Microsoft.Toolkit.Mvvm.Input;

namespace Maui.Progression.ViewModels;

public partial class Counter : ObservableObject
{
    readonly INumberMapper numberMapperService;

    [ObservableProperty]
    [AlsoNotifyChangeFor(nameof(CountText))]
    int count;

    public Counter(INumberMapper numberMapperService) => this.numberMapperService = numberMapperService ?? new NumberMapper();

. . .

In the app, open Mainpage.xaml.cs and change to this. Notice we're now injecting the Counter view model.

using Maui.Progression.ViewModels;

namespace Maui.Progression;

public partial class MainPage : ContentPage
{
	public MainPage(Counter viewModel)
	{
		InitializeComponent();
		BindingContext = viewModel;
	}
}

Open MauiProgram.cs and change to this. We're configuring the application's dependency injection service, telling it "If a parameter is of this type, then automatically create or use an existing instance so I don't have to code it myself."

using Maui.Progression.DomainServices.Interfaces;
using Maui.Progression.ViewModels;

namespace Maui.Progression;

public static class MauiProgram
{
	public static MauiApp CreateMauiApp()
	{
		var builder = MauiApp.CreateBuilder();
		builder
			.UseMauiApp<App>()			
			.ConfigureFonts(fonts =>
			{
				fonts.AddFont("OpenSans-Regular.ttf", "OpenSansRegular");
				fonts.AddFont("OpenSans-Semibold.ttf", "OpenSansSemibold");
			});

		builder.Services.AddSingleton<INumberMapper>(new NumberMapper());
		builder.Services.AddSingleton<Counter>();
		builder.Services.AddSingleton<MainPage>();

        return builder.Build();
	}
}

Now we can update the Counter_Should test class.

using Maui.Progression.ViewModels;
using FluentAssertions;
using NSubstitute;
using Maui.Progression.DomainServices.Interfaces;
using Maui.Progression.Domain.Models;

namespace Maui.Progression.UnitTests;

public class Counter_Should
{
    readonly INumberMapper numberMapperService;
    Counter? counter;

    public Counter_Should()
    {
        // Mock the service interface. We want to control the domain model it returns.
        numberMapperService = Substitute.For<INumberMapper>();
    }

    [Fact]
    public void Increment_counter_by_one_using_command()
    {
        // arrange
        int expectedNumber = 1;
        string expectedWord = "one";
        NumberMap map = new()
        {
            Map = new List<NumberMapItem>()
            {
                new NumberMapItem() { Number = expectedNumber, Word = expectedWord }
            }
        };
        numberMapperService.GetNumberMap().Returns(map);

        // Inject the service into the view model
        counter = new Counter(numberMapperService);

        // verify the starting count
        counter.Count.Should().Be(0, "starting count should have been zero.");

        // act
        counter.IncreaseCounterCommand.Execute(null);

        // assert
        counter.Count.Should().Be(expectedNumber);
        counter.CountText.Should().Contain(expectedWord);
    }
}

What's going on here?

  1. Declare our service interface and Counter view model
  2. Mock the service. We don't want it calling the outside world. We want to control its behavior.
  3. Inject our mocked service into the view model
  4. Test that the view model increments by 1, and the text contains "one".
  5. Part of the test includes explicitly setting what NumberMap object the service will return before instantiating the view model.

Confession
Right about here I had to close Visual Studio, delete all the solution bin and obj folders, reopen Visual Studio and rebuild the solution. I kept getting a "Cannot resolve Assembly" warning in ViewModels/bin/Debug. When I rebuilt, it revealed errors that weren't being listed before. But this won't happen to you, of course!

At this point, you should be able to build the solution and run the test, which will fail. But not the way I expected.

System.IO.FileNotFoundException : Could not load file or assembly 'Microsoft.Maui.Essentials,

Well, heck. How is the solution building but not running for the test? It's because of this line in Counter.cs.

SemanticScreenReader.Announce(text);

Our test doesn't have a .NET MAUI platform context, so it can't run the SemanticScreenReader. The purpose of this is accessibility. We don't want to lose that, but Microsoft hasn't made it easy on us.

Confession
Ugh, so I hate to do this, but for this tutorial the "solution" is to comment out the SemanticScreenReader.Announce statement. It looks like the way to get this working is mocking the application context. I'll try that in a later post so I can give it my full attention.

// SemanticScreenReader.Announce(text);

With the above commented out, the test should run and fail.

Expected counter.CountText "Clicked 1 time" to contain "one".

Update the Counter.cs class like so to get the test to pass.

using Maui.Progression.Domain.Models;
using Maui.Progression.DomainServices;
using Maui.Progression.DomainServices.Interfaces;
using Microsoft.Toolkit.Mvvm.ComponentModel;
using Microsoft.Toolkit.Mvvm.Input;

namespace Maui.Progression.ViewModels;

public partial class Counter : ObservableObject
{
    readonly INumberMapper numberMapperService;
    readonly NumberMap map = new();

    [ObservableProperty]
    [AlsoNotifyChangeFor(nameof(CountText))]
    int count;

    public Counter(INumberMapper numberMapper) { 
        this.numberMapperService = numberMapper ?? new NumberMapper();
        map = numberMapperService.GetNumberMap();
    }

    public string CountText
    {
        get
        {
            string text = "Click me";
            if (count > 0)
            {
                var word = map.ToWord(count) ?? "Unknown";
                text = $"Clicked {word} " + (count == 1 ? "time" : "times");
            }
            // SemanticScreenReader.Announce(text);
            return text;
        }
    }

    [ICommand]
    void IncreaseCounter()
    {
        Count++;
    }
}

Run the App

Of course, run the app, 'cause passing unit tests doesn't guarantee success, it just improves the odds.

Confession
Mine didn't run right the first time. I forgot to pass the options to the JSON deserializer. Which led me to improving the test.

Wrap Up

Properly adding a domain model involved quite a bit of work. Hopefully it's also clear that the increase in code resulted in a significant increase in testability.

Next up: Refactoring the View!

References

Jeffrey Palermo codified the Onion Architecture many years ago. I use it. I think you should, too.

Onion Architecture: Part 4 – After Four Years | Programming with Palermo

Steve Smith is an excellent developer. So is Julie Lerman. They're so good that even though I haven't watched this course, I'm sure it's tops.

Domain-Driven Design Fundamentals | Pluralsight

And I'll bet this YouTube presentation is a great intro.

Clean Architecture with ASP.NET Core with Steve Smith | Hampton Roads .NET Users Group - YouTube


  1. Or we might!